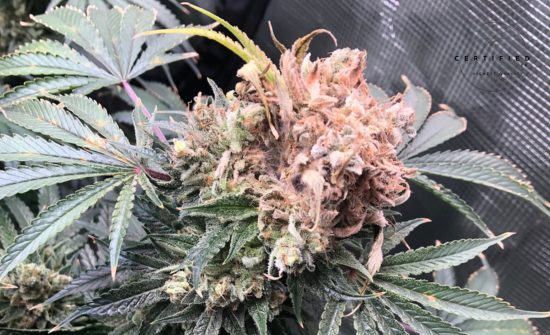
For any cannabis cultivator, few discoveries are as disheartening as the appearance of bud rot within a flourishing canopy. What begins as a subtle discolouration can swiftly spread, transforming dense, resinous flowers into a soft, grey, unusable mass. This destructive disease, caused by the pervasive fungal pathogen Botrytis cinerea, represents one of the most significant threats to cannabis crops globally, capable of inflicting substantial losses both before and after harvest.
Understanding this notorious fungus – its intricate life cycle, the environmental conditions it thrives in, and its mechanisms of infection – is the most critical step in safeguarding your valuable crop. This guide, drawing on extensive scientific research, will provide an in-depth look at Botrytis cinerea to help you proactively identify, manage, and ultimately prevent this silent threat in your garden.
What is Botrytis cinerea?
Botrytis cinerea, commonly known as grey mould or bud rot, is a highly successful and ubiquitous necrotrophic fungus. This means it obtains its nutrients by actively killing host plant cells and feeding on the dead tissue. It boasts an incredibly vast host range, capable of infecting over 1,000 plant species, including economically significant agricultural crops like strawberries, grapes, and tomatoes. In cannabis, it is the primary culprit behind bud rot, specifically targeting the dense, moisture-retaining inflorescences.
The fungus is a master of survival, utilising various forms and strategies to persist and spread, making it a persistent challenge in both indoor and outdoor cultivation environments.
The Life Cycle of Bud Rot: From Microscopic Spore to Devastating Decay
To effectively combat Botrytis, a clear understanding of its operational blueprint is essential. The diagram below illustrates the typical disease cycle, which, under ideal conditions, can progress from initial infection to full bud rot in as little as 3–4 days.

A Step-by-Step Breakdown of the Cycle:
- Inoculum and Spore Landing: The cycle almost always begins with microscopic, airborne spores called conidia. These conidia are the primary means of transmission and are a constant presence in the environment. They can originate from resilient overwintering structures known as sclerotia (hardened masses of fungal mycelium) in soil or plant debris, or from previously infected plant material. Carried by wind or splashing water, these spores land on susceptible parts of the cannabis plant.
- Spore Germination and Penetration: For the dormant spore to activate and germinate, it requires specific conditions, primarily sustained moisture and an accessible nutrient source. Once hydrated, the spore produces a germ tube that initiates penetration into the plant tissue. In cannabis, the exposed stigmas (pistils) of young flowers often serve as a prime entry point, providing both moisture and a rich nutrient source. The fungus employs a combination of physical pressure and enzymatic activity (releasing cell-wall-degrading enzymes) to breach the plant’s outer defences.
- Colonisation and Early Infection: Once inside the plant, Botrytis begins to colonise the host tissue. It can initially enter a biotrophic phase, where it lives within the plant without immediately killing cells, often suppressing the plant’s initial defence responses. This can lead to latent infections, where the fungus is present but no visible symptoms are apparent, complicating early detection.
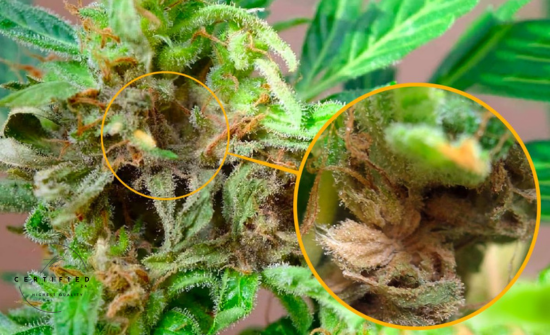
- Necrosis and Bud Rot Development: Triggered by factors such as tissue maturity (e.g., ripening flowers), senescence, or environmental stress, the fungus switches to its aggressive necrotrophic phase. It begins to secrete phytotoxins (like botryoidal and botcinic acid) and enzymes that actively kill plant cells. This is the stage where the familiar symptoms of bud rot emerge: water-soaked spots, rapid browning and softening of tissues, and the eventual decay and collapse of the entire flower structure.
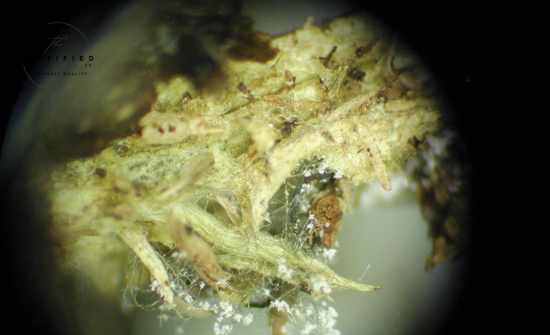
- Reproduction and Spore Dissemination: As the fungus consumes the dead tissue, it rapidly produces new conidiophores – structures that bear masses of new conidia. These grey, fuzzy structures emerge from the decaying bud, releasing a fresh wave of spores into the air, ready to infect adjacent buds or other plants. This secondary spread is rapid and devastating.
- Overwintering: If infected plant material is left behind (e.g., in soil or on surfaces), the fungus can form resilient sclerotia. These dormant structures allow Botrytis to survive harsh conditions, awaiting favourable temperatures and moisture to initiate new infections in subsequent growing seasons.
Environmental and Plant Factors Driving Bud Rot
Botrytis cinerea is not an all-powerful entity; its success hinges on the presence of specific environmental conditions. For growers, manipulating these factors is the most potent line of defence against infection.
- Humidity is the Prime Culprit: High relative humidity (RH) is the single most critical factor for Botrytis spore germination and mycelial growth. Levels above 85–90% RH are highly conducive to its development. Conversely, maintaining RH below 65% in your grow environment can effectively inhibit the fungus. As discussed in our previous blog on burping, controlling humidity is paramount for preventing mould and maintaining bud quality.
- Temperature’s Influence: Botrytis is generally a cool-season disease. Its optimal temperature range for growth and sporulation is typically between 15–22°C (59–72°F). While it can survive cooler conditions, its growth is significantly reduced at temperatures above 30°C (86°F). This highlights a balancing act for growers, especially in indoor environments, to find the sweet spot that favors plant growth but inhibits pathogen development.
- Moisture and Leaf Wetness: Any form of free moisture on the plant surface – whether from condensation (due to sharp temperature drops), guttation (exudation from leaves overnight), or improper watering – provides the essential hydration for spores to germinate and infect. Prolonged periods of leaf wetness are a major risk factor.
- Air Circulation and VPD: Poor air movement and stagnant conditions create humid microclimates around plants, especially within dense canopies. Maintaining adequate Vapour Pressure Deficit (VPD) is crucial for healthy plant transpiration and for keeping plant surfaces dry. Circulating fans and proper ventilation are essential tools to prevent these humid pockets from forming.
- Plant Architecture and Density: The physical structure of your cannabis plants directly impacts susceptibility. Strains that produce very large, dense, and compact inflorescences with many overlapping leaves are inherently more susceptible to bud rot. This dense architecture traps moisture and hinders airflow, creating ideal microclimates for the fungus.
The Nuance of Plant Chemistry: Cannabinoids, Terpenes, and Defence
While cannabis plants produce a complex array of secondary metabolites, including cannabinoids and terpenes, their direct role in defending against Botrytis cinerea is a nuanced and ongoing area of research.
Antifungal Properties of Terpenes/Essential Oils: Studies on essential oils derived from other plants (like tea tree oil, oregano, cinnamon, and thyme) have demonstrated strong antifungal activity against Botrytis cinerea in laboratory settings. These terpenes can disrupt fungal cell walls and membranes. While cannabis itself contains many of these same terpenes, direct evidence for their efficacy against Botrytis on the cannabis plant is still being explored. Some research indicates that specific terpene profiles or their emissions from maturing inflorescences might even influence Botrytis development on cannabis, though results are not always consistent.
Cannabinoids and Resistance: Similarly, the direct fungicidal effect of cannabinoids like THC and CBD against Botrytis on the living plant remains a complex area of study. While cannabis plants do possess innate defence responses at the biochemical and molecular levels (involving hormonal pathways like Jasmonic Acid and Ethylene, and Salicylic Acid), no known cannabis resistance genes to Botrytis have been conclusively identified yet. This means relying solely on the plant’s inherent chemical defenses for bud rot prevention is not a primary, reliable strategy.
This understanding underscores that while cannabis is a biorefinery of fascinating compounds, a holistic IPM strategy, rather than just chemical composition, is the most robust defence against Botrytis.
Integrated Management: A Proactive, Multi-Layered Defence
Given that Botrytis cinerea is notoriously difficult to eradicate once established, prevention is always the most effective strategy. A comprehensive and proactive Integrated Pest Management (IPM) program is essential. This combines various approaches to create an environment where Botrytis simply cannot thrive.
Cultural Practices: These focus on optimising the grow environment and plant health:
- Strategic Strain Selection: Prioritise genetics that naturally exhibit a more open, less compact bud structure, which is less conducive to moisture retention.
- Meticulous Sanitation: Regularly remove all dead or dying plant material, fallen leaves, and debris from your grow space. This eliminates potential food sources and inoculum for the fungus.
- Targeted Defoliation and Pruning: Thoughtful defoliation, especially in the lower and inner canopy, improves airflow, reduces humidity pockets, and allows better light penetration. Pruning should be clean to avoid creating open wounds.
- Optimal Plant Density: Avoid overcrowding plants in your grow space. Proper spacing significantly enhances air circulation and light exposure throughout the canopy.
- Nutrient Management: While direct links between specific nutrients and Botrytis resistance in cannabis can be conflicting, maintaining overall plant health through balanced nutrition (avoiding extremes, as discussed in our NPK optimisation guide) inherently boosts a plant’s resilience to stress and pathogens.
Environmental Modification: Precise control of atmospheric conditions is paramount:
- Rigorous Humidity Control: This is your primary defence. Utilise dehumidifiers, proper exhaust, and oscillating fans to consistently keep RH below 65% during flowering, and avoid sharp RH spikes.
- Optimised Temperature Control: Maintain temperatures within the optimal range for cannabis growth while being mindful of night-time drops that can lead to condensation and conditions favourable for Botrytis.
- Enhanced Airflow: Ensure continuous, gentle air movement across and within the canopy. This prevents stagnant air pockets and promotes rapid drying of any moisture on plant surfaces.
- Biological Control Agents (Biofungicides): This approach offers a powerful, reduced-risk alternative or supplement to other strategies:
- Harnessing Beneficial Microbes: Biofungicides utilise specific strains of beneficial bacteria (like Bacillus and Pseudomonas) and fungi (like Trichoderma) that can naturally suppress Botrytis.
- Mechanisms of Action: These agents work through various means: by competing with Botrytis for space and nutrients, by producing antifungal compounds that directly inhibit the pathogen, or by triggering the plant’s Induced Systemic Resistance (ISR), essentially “priming” the plant’s own defence mechanisms to better fight off invaders. Several such products are approved for use on cannabis in various regions, offering a clean, effective layer of protection.
Post-Harvest Management: The Final Stand: The battle against bud rot extends beyond harvest.
- Proper Drying Techniques: Your drying space must have excellent airflow and be maintained at appropriate temperature and humidity levels to dry buds efficiently and thoroughly. This minimises the window for Botrytis to proliferate.
- Controlled Curing: As emphasised in our burping discussions, curing must be done in a controlled environment with proper burping or humidity control packs (like Boveda) to prevent moisture accumulation, which can reactivate dormant mould spores and lead to costly product recalls.
- Rigorous Inspection: Inspect every bud during trimming and curing. Any sign of rot, no matter how small, must be immediately removed and discarded to prevent it from spreading to healthy material.
Cultivating Resilience and Protecting Your Harvest
The threat of Botrytis cinerea is a constant challenge for cannabis cultivators, capable of undermining months of hard work. However, armed with scientific knowledge and a proactive mindset, it is a challenge that can be overcome. The key lies not in a single solution, but in a holistic and integrated IPM strategy.
By intentionally selecting resistant strains, meticulously controlling your environment, implementing diligent cultural practices, and leveraging the power of biological controls, you transform your grow space into an inhospitable fortress against Botrytis. This multi-layered defence, coupled with unwavering vigilance from propagation to post-harvest, empowers you to protect your plants and ensure your efforts culminate in the clean, healthy, and high-quality buds you aspire to cultivate.


