Winter has a distinct presence across South Africa, ushering in diverse conditions: some regions embrace a damp chill, others endure parched cold, and much of the country experiences dramatically lower temperatures. For cannabis growers, this seasonal shift introduces a unique set of challenges and opportunities. While seemingly controlled environments like indoor setups and greenhouses offer a refuge from the harshest outdoor elements, they are by no means immune to winter’s pervasive influence.
Without meticulous planning and precise environmental management, the very systems designed to protect your plants can inadvertently become sources of unexpected issues, impacting growth, yield, and overall plant health. This guide, informed by comprehensive research into plant physiology, climate patterns, and common cultivation pitfalls, aims to equip you with the knowledge to not just survive, but thrive through the colder months.
South Africa’s Winter Canvas: A Complex Growing Environment
Unlike regions with more uniform seasonal shifts, South Africa’s climate is a mosaic of influences. As highlighted by the study by Van der Walt and Fitchett (2020), defining precise seasonal boundaries here is complex due to our subtropical location, varied altitudes, and the intricate interplay of major atmospheric circulation features with oceanic currents (the warm Agulhas Current along the east coast and the cold Benguela Current along the west).
This inherent regional variability means that a “winter grow” strategy must be highly adaptable. Even when cultivating indoors or in a greenhouse, external ambient temperatures and humidity can subtly yet significantly influence your internal environment, necessitating specific adjustments to maintain optimal conditions for your plants.

The Indoor/Greenhouse Paradox: Shelter Requires Vigilance
The allure of indoor and greenhouse cultivation during winter is undeniable—it offers the promise of full control over crucial growth parameters. Yet, this control comes with its own set of demands and potential pitfalls if neglected:
- The Promise of Control: These environments allow you to precisely manipulate temperature, humidity, and lighting, creating a consistent microclimate optimized for cannabis growth. You can provide ideal daytime temperatures 18-26°C and nighttime temperatures 10-18°C, ensuring metabolic processes, photosynthesis, and nutrient uptake remain efficient, in stark contrast to the struggles associated with true outdoor cold-weather cultivation.
- The Burden of Management:
- Soaring Energy Costs: Maintaining optimal temperatures indoors when external temperatures plummet demands significant energy for heating. This can drastically increase operational expenses, turning a potentially profitable grow into a financial drain if not carefully managed.
- Subtle Climatic Influence: Even seemingly sealed environments are not completely isolated. Air exchange with the outside, through ventilation systems or minor structural gaps, means external winter humidity and temperature can influence your internal climate, creating unexpected fluctuations for your environmental controls.
- Temperature Stress and Growth Impact: While providing warmth protects plants from freezing, inconsistent indoor temperatures (especially significant drops) can still induce plant stress. Such stress can slow plant metabolism, hinder nutrient uptake, and potentially impact the final cannabinoid and terpene profiles. Our previous discussions on cold acclimation, for instance, showed that prolonged cold can decrease overall cannabinoid content in hemp.
- Light Deficiency: Winter brings shorter days and often cloudier skies, leading to significantly reduced natural light. This necessitates a greater reliance on supplemental artificial lighting to ensure your plants receive adequate Photosynthetically Active Radiation (PAR) for vigorous growth and flowering.
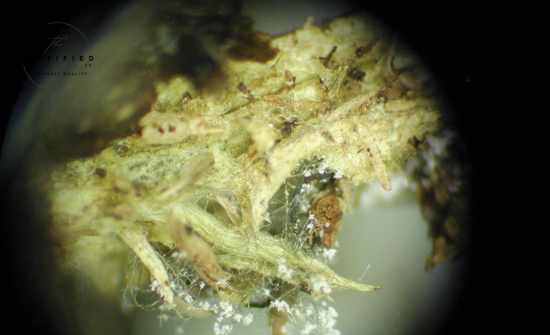
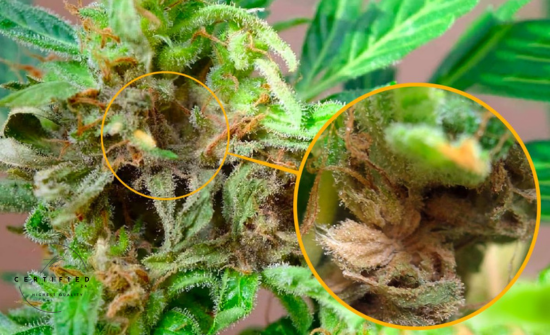
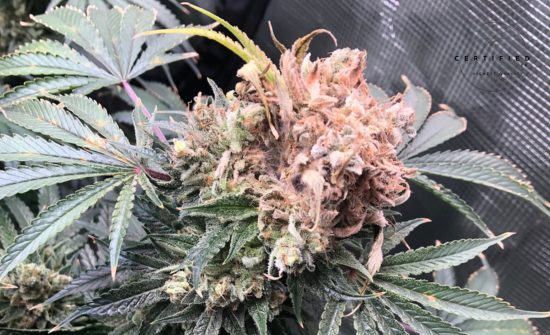
- Heightened Disease Risk (Especially Bud Rot): This is arguably the most critical winter challenge. If temperature control is inconsistent or humidity management is inadequate, your “controlled” environment can inadvertently become a perfect incubator for fungal pathogens. Bud rot, caused by Botrytis cinerea, thrives in conditions of moderate temperatures (15-22°C coupled with high relative humidity (above 85-90%) and periods of leaf wetness. If your heating struggles or your ventilation is insufficient to combat winter’s inherent humidity, you risk creating precisely these conditions internally, leading to devastating infections.

Optimizing Your Winter Grow: Strategic Planning and Execution
Successful winter cannabis cultivation is a marathon, not a sprint. It demands meticulous planning, proactive management, and constant adaptation.
- Strategic Strain Selection:
- Cold Hardiness & Resilience: While indoor environments mitigate direct cold, selecting strains known for overall resilience to environmental stress can be beneficial. Also, consider genetics with shorter flowering periods if you anticipate challenges maintaining ideal conditions late into the cycle, allowing you to harvest before extreme cold potentially impacts your systems.
- Disease Resistance: Prioritise strains that are less susceptible to common winter ailments. While bud rot is a primary concern due to its preference for humid microclimates within dense buds, other fungal issues like powdery mildew can also proliferate in less-than-ideal winter indoor conditions.
- Precision Environmental Control:
- Aggressive Humidity Management: This is your paramount defence against many winter ailments, including bud rot. Utilise dehumidifiers and ensure continuous, effective air exchange. Maintain your Vapour Pressure Deficit (VPD) within optimal ranges to promote healthy plant transpiration and prevent condensation on plant surfaces.
- Consistent Airflow: Implement oscillating fans strategically throughout your grow space to ensure constant, gentle air movement across and within the plant canopy. This is critical for preventing stagnant, humid air pockets that invite fungal growth.
- Stable Temperature Regimes: While manipulating temperatures can induce specific traits (like purple colouration), avoid prolonged periods within Botrytis‘s preferred temperature range (15-22°C), especially when coupled with high RH. Consistent temperatures benefit overall plant metabolism.
- Meticulous Cultural Practices:
- Thoughtful Nutrient Adjustments: Cooler root zone temperatures, even indoors, can impact nutrient uptake efficiency. While our NPK optimization research provided specific targets for vegetative growth in controlled conditions, remember that colder conditions can reduce metabolism. Monitor your plants closely for signs of nutrient lockout or deficiency. Adjust your feeding schedule to reflect potentially slower growth rates and ensure adequate nutrient availability, perhaps leaning towards more readily available forms of key nutrients.
- Adaptive Watering Habits: Evaporation rates are significantly lower in cooler, more humid winter environments. Overwatering is a common pitfall. Always check the moisture level of your growing medium before watering, ensuring it’s appropriately dry before re-watering to prevent root issues and excess humidity.
- Sanitation and Maintenance: Regularly remove any dead or yellowing leaves, fallen debris, and other organic matter from your grow space. This eliminates potential food sources and inoculum for pathogens. Strategic defoliation also improves light penetration and airflow within the canopy.
- Harnessing Biological Guardians:
- Integrate Biofungicides: Consider incorporating registered biological control agents (biofungicides) into your Integrated Pest Management (IPM) program as a proactive measure. These beneficial microbes—such as specific strains of Bacillus and Trichoderma—can colonise plant surfaces, outcompete pathogens, produce antifungal compounds, or even trigger the plant’s Induced Systemic Resistance (ISR). This “priming” of the plant’s immune system helps it to better defend itself against threats like Botrytis cinerea, offering a sustainable and effective layer of protection.

Cultivating Resilience and Ensuring a Quality Harvest
The South African winter, with its diverse and challenging climatic conditions, presents unique demands for cannabis growers. While indoor and greenhouse environments offer critical control, they require unwavering diligence and precision to prevent them from becoming unwitting incubators for cold-related stresses and devastating diseases like bud rot.
By understanding the intricate interplay of genetics and environment, strategically selecting resilient strains, meticulously managing your environmental conditions, implementing diligent cultural practices, and leveraging the power of biological control agents, you can transform the perceived limitations of winter into an opportunity. This comprehensive, multi-layered approach empowers you to protect your plants, optimize your yields, and ensure your hard-earned efforts culminate in a clean, healthy, and high-quality harvest, even when temperatures outside plummet.