Posted on

The Power of Micronutrients in Cannabis Cultivation

Micronutrients for cannabis plant

Last week, we explored the essentials of watering cannabis and managing macronutrients like nitrogen, phosphorus, and potassium (NPK). This week, we’re delving deeper into an often-overlooked but equally vital aspect of cannabis nutrition: micronutrients. While required in smaller amounts, micronutrients are crucial for a plant’s metabolic processes, structural development, and cannabinoid production.

In this blog, we’ll highlight the key micronutrients your cannabis plants need, how they function, and practical tips to ensure your plants get the right balance for optimal growth and yields.

Organic or Synthetic Nutrients

What Are Micronutrients, and Why Do They Matter?

Micronutrients are trace elements that cannabis plants require in small quantities but are essential for overall health and development. Unlike macronutrients, which support bulk growth, micronutrients play a regulatory role in processes like enzyme activation, photosynthesis, and stress resistance.

Key Micronutrients for Cannabis:

Iron (Fe): Vital for chlorophyll synthesis and energy transfer.

Zinc (Zn): Essential for hormone production and enzyme activity.

Manganese (Mn): Supports photosynthesis and nitrogen metabolism.

Copper (Cu): Aids in lignin synthesis and overall structural integrity.

Boron (B): Critical for cell wall formation and reproductive growth.

Molybdenum (Mo): Helps convert nitrogen into usable forms.

While deficiencies in these elements can lead to stunted growth, yellowing leaves, or poor bud formation, proper management ensures your plants thrive.

Signs of Micronutrient Deficiency in Cannabis

Micronutrient deficiencies can be subtle at first but quickly impact plant health if left unaddressed. Here’s how to identify common deficiencies:

Iron Deficiency: Yellowing between leaf veins (chlorosis), especially in new growth.

Zinc Deficiency: Stunted growth, smaller leaves, and distorted bud development.

Manganese Deficiency: Yellow or brown spots on leaves and slowed photosynthesis.

Copper Deficiency: Dark green leaves with tips turning purple or wilting.

Boron Deficiency: Deformed or brittle leaves and slow stem growth.

Sources of Micronutrients: Organic and Synthetic Options

Ensuring an adequate supply of micronutrients can be achieved through organic amendments, synthetic fertilisers, or foliar feeding. Here are some options to consider:

Organic or Synthetic Nutrients

Organic Sources:

Compost and Worm Castings: Rich in trace elements and beneficial microbes.

Seaweed Extracts: Provide a natural source of micronutrients like zinc and boron.

Rock Dust: Contains iron, manganese, and other minerals.

Fish Emulsion: Includes trace amounts of molybdenum and copper.

Synthetic Micronutrient Supplements:

Chelated micronutrient blends ensure better absorption in varying soil pH conditions.

Use sparingly to avoid over-fertilization, which can lead to toxicity.

Foliar Feeding:

Quick absorption of micronutrients through the leaves is ideal for addressing deficiencies rapidly.

Optimising Micronutrient Absorption

Certain factors can limit their availability even if your soil or fertiliser contains adequate micronutrients. Understanding these conditions is key to optimising absorption.

Organic or Synthetic Nutrients

Factors Influencing Micronutrient Uptake:

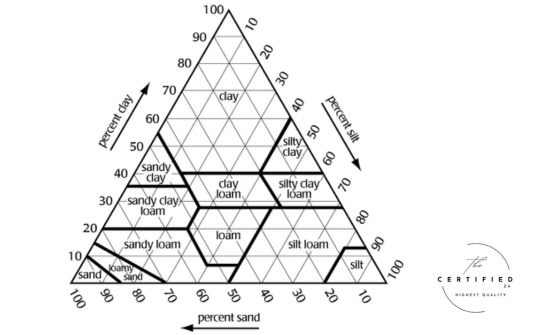
Soil pH: Micronutrients are most bioavailable in slightly acidic soils (pH 6.0–6.5). Alkaline soils often lock out iron, zinc, and manganese.

Soil Drainage: Poor drainage leads to waterlogging, reducing oxygen and microbial activity, which are essential for nutrient uptake.

Compaction: Hard, compacted soil restricts root growth and limits access to nutrients.

To maximize micronutrient absorption:

Regularly monitor and adjust pH levels.

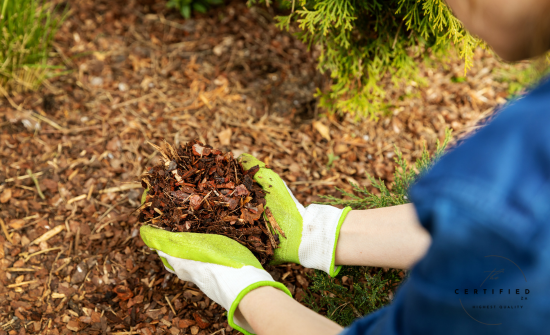
Improve soil structure with amendments like perlite or coco coir.

Incorporate humic acid to enhance nutrient availability and root development.

Pro Tips for Flowering Nutrition:

Add micronutrient boosters during the flowering phase for optimal bud production.

Use organic top-dressings like rock dust or bone meal for a slow-release effect.

Ensure your watering routine supports even distribution of nutrients.

Balancing Micronutrients for Cannabis Success

While micronutrients are essential, over-supplying them can lead to toxicity, which harms your plants as much as deficiencies do. For example, excess copper can cause leaf burn, while too much boron can disrupt root development. Striking the right balance is critical.

Tips for Micronutrient Balance:

Start with a soil test to understand your starting nutrient levels.

Use micronutrient-specific fertilizers only when deficiencies are evident.

Rotate between organic amendments and synthetic supplements for a balanced approach.

Understanding Soil

Final Thoughts: Small Elements, Big Impact

Micronutrients may be needed in small amounts, but their impact on cannabis health and yield is profound. By ensuring your plants receive a balanced diet of iron, zinc, manganese, and other trace elements, you can elevate their growth, potency, and resilience.

As you continue refining your nutrient management practices, remember that attention to detail in these small elements can lead to big rewards—healthier plants, richer harvests, and a thriving garden you can be proud of.

Posted on

Composting, How it works

Composting, how it works

In the past weeks, we’ve delved into everything from propagation techniques to plant training strategies. This week, as your cannabis plants continue to grow, it’s time to focus on one of the foundational practices that can significantly enhance their health and yield: composting. Composting is a simple, natural way to enrich your soil, and it’s an investment that pays off over time. With methods like hot composting, Hugelkultur, and bokashi, you have several options to suit your needs, each bringing unique benefits to your cannabis cultivation.

While creating compost may seem straightforward, it can become time-consuming on a larger scale without efficient tools. Let’s explore how to get started with composting, the different techniques available, and the best ways to manage raw materials for a successful composting process that supports your cannabis garden.

composting, how it works

The Basics of Composting: Transforming Waste into Vital Nutrients

Composting is a natural process where organic materials decompose to form a nutrient-rich substance that resembles humus. Through aerobic decomposition, microorganisms break down green (nitrogen-rich) and brown (carbon-rich) materials, turning waste into compost. This final product, packed with microbes and essential nutrients, enhances soil structure, aids water retention, and stimulates root growth—perfect for cannabis cultivation.

Hot composting is a highly efficient way to create compost. This method relies on maintaining a high temperature within the compost pile to speed up decomposition. Hot composting, as described in your resources, can yield garden-ready compost in as little as three months if managed well. This quick turnaround makes it ideal for cannabis growers who need a steady supply of compost.

Hot Composting: Quick, Effective, and Full of Nutrients

Though labour-intensive, hot composting is one of the fastest and most effective methods. Here’s how to get started:

Layer materials: Begin with a foundation of brown materials (like straw or dried leaves), alternating layers of greens (like vegetable scraps or fresh grass clippings) with browns to maintain a balanced carbon-to-nitrogen ratio. Make sure to keep the Browns material to a small size. Having large wood pieces will slow the quick composting down. So do your best to have twigs and sticks as small as possible. 

Maintain moisture: The pile should be moist but not soaking; aim for the feel of a wrung-out sponge. I always say, to start by adding water to the piles as you build them. Not too much but wet everything as you build your brown layers.

Incorporate some dirt or Soil: Adding in a small amount of dirt with your brown layers will help with moisture but also beef up your compost pile. Make sure that the dirt does not exceed 10% of the total browns. 

Monitor temperature: Use a compost thermometer to ensure the pile reaches around 55–60°C. When it hits this range, turn the pile to aerate it and regulate heat.

Turn regularly: Flip the pile each time it hits the ideal temperature range, usually every few days.

By following these steps, you’ll have nutrient-rich compost in 2–3 weeks, perfect for the soil. Or even as a top dress for your growing plants. More advanced growers will use this compost in their compost teas, ensuring the bioavailability of the nutrients. 

composting, how it works

Hugelkultur: Long-Lasting Nutrients and Moisture Retention

Hugelkultur is a unique form of composting that’s perfect for cannabis gardens requiring long-lasting, slow-releasing nutrients. Originating from German permaculture, Hugelkultur involves burying large logs or branches at the base of a planting bed, which slowly decomposes over time. This decomposition provides a continuous source of nutrients and helps retain moisture, reducing the need for frequent watering.

Over the years, the sophistication of Hugelkultur’s have gotten better. Consider not only adding large wood pieces at the bottom but also some stones too. Over time this will also provide minerals to the soil as it breaks down slowly over time. The higher up the Hugelkultur is built the smaller the materials are that make up each layer. In the end, it will be a little mound that will be able to sustain life perpetually over time with very minimal inputs. 

Composting, how it works

This method is ideal for outdoor cannabis growers who want a sustainable, low-maintenance approach to soil enrichment. As the wood breaks down, it becomes a natural sponge, holding water and releasing nutrients slowly—making it an excellent foundation for cannabis plants that require consistent moisture and nutrient availability.

Bokashi: A Fermentation-Based Approach

Bokashi composting is an anaerobic (oxygen-free) fermentation process, perfect for indoor composting or small spaces. By adding a microbial inoculant, typically a mixture of lactic acid bacteria, yeast, and other beneficial microbes, bokashi breaks down organic material without odour. This method is ideal for home growers who need a compact solution for composting kitchen scraps.

The fermented material from bokashi can be added to your compost pile or buried directly in the soil. It speeds up the composting process and enriches the soil, especially beneficial for cannabis roots that thrive in a microbe-rich environment. Bokashi’s compact process also makes it accessible for those with limited space. You can find various types of Bokashi compost bins for home use online. Building one can be simple too. The main thing is to use an effective microbial solution to break down your scraps. Also, make sure that you can drain liquid strain from the Bin. this will be gold for Compost teas too.

Composting, how it works

Fish Hydrolysate: A Nutrient-Rich Boost for Your Cannabis

Fish hydrolysate, a liquid fertilizer made from whole fish or fish waste, is another excellent compost addition. It’s rich in nitrogen, amino acids, and minerals that support robust growth and flowering in cannabis plants. Unlike traditional fish emulsion, fish hydrolysate is cold-processed, retaining more nutrients.

However, making this is not really ideal for your neighbours and the smell can be overwhelming. So please be mindful if you are going to attempt this. Whole fish with a little bit of water crushed, mixed with unsulphured molasses. Good luck.

For cannabis growers, adding fish hydrolysate to compost or directly to soil can enhance microbial activity and enrich nutrient levels. Just remember that fish products can attract pests, so take care when applying them outdoors. You can also look at buying quality fish hydrolysate from reputable brands already established in our country.

Handling Raw Manure: High in Nutrients, But Use with Care

Raw manure is a powerful nitrogen source but requires careful handling due to potential pathogens and its tendency to burn plants if applied fresh. When composted properly, manure can be transformed into a safe, effective fertilizer that’s perfect for cannabis.

If this is the route you are going. Ensure that you pile up all the manure together in a big enough pile for it to generate heat. At least a cubic meter in height. Make sure, just like with the quick hot compost that the manure is not too wet, if it is add some dirty, straw or dry leaves to it. Monitoring the pile will be important so having the tools to measure the temperature. Unlike with the Hot compost pile, you need to kill pathogens so avoid touching it with your hands and have a thermometer at hand. Once the pile reaches the ideal temperature, start turning it. Once the entire pile has been turned and left to reach the temperature, has no odor and is blackish in colour it will be ready to use in your gardens.

Composting, How it works

Making Compost Work for Your Cannabis Garden

From hot composting to the innovative Hugelkultur and bokashi methods, composting offers cannabis growers a sustainable, effective way to boost soil health. Creating your own compost is simple, but as your scale increases, it can become time-consuming without efficient tools or systems. However, the results— richer soil, healthier roots, and more robust plants—are well worth the investment.

Taking the time to understand and implement these composting methods is a gift to your cannabis garden. Not only will it enhance the growth of your plants, but it also brings a deep sense of connection to the natural processes that sustain them.

Posted on

Cannabis Sativa L: The People’s Plant

Cannabis Sativa L

As the season progresses, I believe I’ve shared some valuable insights and concepts for cultivating a thriving cannabis garden. Over the past two months, we’ve explored a range of topics, from propagation to transplanting and plant training, all crafted to help you maximise your growing efforts. This week, however, I want to pause and focus on Cannabis sativa L. itself—the “people’s plant.”

After weeks of “how-to” guides, it’s essential to let the plants breathe, to implement the practices we’ve discussed, and to give your cannabis the time it needs to flourish. Today, we’re celebrating the many dimensions of this remarkable plant and the impact it continues to have on both our lives and our environment.

Cannabis Sativa L

The Rich Spectrum of Cannabis: More Than Just a Plant

Cannabis is often hailed as the “plant of a thousand molecules.” This remarkable diversity of compounds is what gives it such a broad spectrum of uses. From therapeutic cannabinoids to aromatic terpenes and protective phenolics, cannabis is a natural pharmacy, encapsulating compounds that support wellness, relieve pain, and foster mental clarity. The plant’s fibrous qualities even extend beyond health, as it provides strong, sustainable fibres suitable for textiles, bioplastics, and even construction materials like hempcrete.

Today, Cannabis is recognised in two parts. Cannabis as Medicine and Hemp as an Industrial plant, with its applications. There are over 700 different cannabis varieties and each one has its own unique application in the field. Making Cannabis one of the most versatile plants in the world. 

Each compound found within Cannabis sativa has a unique role, whether in enhancing health or in contributing to the resilience of the plant itself. For example, cannabinoids, which include THC and CBD, interact with the human endocannabinoid system to help manage pain, anxiety, and inflammation. Meanwhile, terpenes lend cannabis its signature aroma and provide additional therapeutic effects, enhancing the efficacy of cannabinoids in what is known as the “entourage effect.” We have written some blogs on both of these topics in the past. There are so many more things to learn about cannabis as a whole. We are still discovering new cannabinoids, like the new THCP (tetrahydrocannabiphorol) sai to be 30x stronger than the staple THC compound.

Cannabis Sativa L

Sustainability and Innovation in Cannabis Cultivation

In the current age of environmental awareness, cannabis stands out as a crop that aligns beautifully with sustainable farming principles. This fast-growing plant has a minimal environmental footprint and a range of applications that promote eco-friendly industries. For instance, cannabis fibres, both cellulosic and woody, are strong yet biodegradable, offering a renewable alternative to traditional synthetic materials in industries such as automotive, fashion, and packaging.

Companies like The Greater Value Industrial Project, GVIP are using hemp to make South Africa’s Net-Zero Carbon initiative a reality by providing a real solution to a coal alternative, community integration and a sustainable model to ensure The Just Energy Transition Implementation plan of South Africa is met. Moving us from a Scope-2 Emissions country to a Green economy.

The plant’s deep-rooting system helps prevent soil erosion, and its low water requirements make it more sustainable compared to other fibre crops like cotton. The result is a crop that’s not only beneficial for those who use it but also for the environment it grows in.

Cannabis Sativa L

The Phytochemicals of Cannabis: Natural Molecules with Power

Cannabis isn’t just a source of cannabinoids. It also contains terpenes and phenolic compounds that contribute to its medicinal properties. Terpenes like limonene, pinene, and myrcene offer their own therapeutic benefits, such as reducing inflammation, anxiety, and pain. These compounds, along with cannabinoids, work synergistically to amplify cannabis’s effectiveness—a phenomenon well-known to cannabis enthusiasts as the “entourage effect.

In addition to cannabinoids and terpenes, cannabis contains unique phenolic compounds, including flavonoids like cannflavin A and B. These compounds have potent anti-inflammatory effects, with the potential to contribute to pain relief and healing in new and innovative ways.

Cannabis Trichomes: Nature’s Tiny Factories

Cannabis trichomes, the tiny, crystal-like structures covering the plant’s surface, are where the magic happens. These trichomes house the plant’s primary chemical compounds—cannabinoids, terpenes, and phenolics—making them critical to the plant’s potency and therapeutic value. Not only do trichomes protect the plant from predators and environmental stress, but they also serve as tiny chemical factories, producing compounds that enhance the plant’s resilience and our own well-being.

Trichomes are an essential focus for growers and researchers alike, as their density and health directly affect the quality and potency of cannabis. With advancements in cultivation and extraction techniques, we’re now able to harness these compounds more effectively than ever, making cannabis an even more valuable resource for health and wellness.

The Promise of Cannabis Biotechnology

In recent years, biotechnological advancements have unlocked even more possibilities for Cannabis sativa. Genetic engineering, tissue culture, and metabolomics are just some of the tools researchers are using to enhance the plant’s natural abilities. For example, scientists are developing cannabis strains with specific cannabinoid profiles tailored to treat different conditions, from chronic pain to neurological disorders. There is also ongoing work to increase the yield and resilience of cannabis crops, making them more efficient to grow in diverse climates and conditions.

Through biotechnology, we are poised to make cannabis more accessible and beneficial for a broader range of applications, reinforcing its place as “the people’s plant.” Some might argue that doing this is taking away from the natural beauty and power of the plant, and that is ok too. We should all have our opinion on how industries as a whole should work around the plant. But we cannot take away from the great benefit that biotechonogical advancements have made for us in the cannabis industry.

Cannabis Sativa L

Cannabis: A Symbol of Cultural Resilience

Throughout history, Cannabis sativa has been a plant of the people, cherished across cultures and continents. From traditional uses in textiles and medicine to its revival as a source of wellness, cannabis holds a unique place in human history. It represents resilience, adaptation, and the powerful connection between humans and nature.

As we continue to explore and expand its potential, cannabis remains a symbol of sustainable growth, cultural significance, and boundless opportunity. For those who cherish cannabis, it is more than a plant—it is a source of healing, innovation, and inspiration.

Posted on

Maximise Your Yields With Cannabis Training

Maximise your yield

Last week, we explored the crucial steps for transplanting cannabis plants and how ensuring proper root space can boost growth and yields. This week, we’ll build on that by diving into cannabis plant training—a set of techniques that allow you to shape your plants and maximise their potential. Whether you’re growing in smaller spaces or aiming for bigger harvests, plant training is key to optimising your grow. Some of these techniques also tie back to topics we’ve covered before, such as cannabis propagation and root health, both of which are essential to achieving the best results.

Today we are looking at the concepts and in weeks to come we will break down the various techniques what we really think and how you should approach things with each one. For now, we will look at the overall concept.

Why Train Your Cannabis Plants?

Cannabis plants, if left to grow naturally, will focus their energy on a single, dominant cola at the top. While this produces a single, large bud, it leaves much of the plant’s potential untapped. Through plant training techniques, you can encourage your cannabis plants to spread their energy across multiple bud sites, leading to more colas, fuller canopies, and ultimately larger yields.

Plant training is also crucial for those growing in smaller spaces. Techniques like low-stress training (LST) and high-stress training (HST) allow you to manipulate the shape and structure of the plant, controlling vertical growth and optimising light exposure for all bud sites.

Low-Stress Training (LST): Gentle Yet Effective

Low-stress training (LST) is one of the most popular methods for home growers, particularly those with space constraints. This gentle technique involves bending and tying down branches to encourage horizontal growth. By doing so, you can create a fuller canopy that maximises light penetration to all parts of the plant, increasing bud production.

Maximise your yield with cannabis training

How to Perform LST:

Bend the branches: Use soft ties to gently bend the branches away from the main stem, spreading them out horizontally.

Tie them down: Secure the bent branches in place using string or plant ties, allowing the plant to maintain this new shape.

Adjust as needed: Continue to adjust and tie new growth throughout the vegetative stage.

The beauty of LST is that it minimises stress on the plant, allowing for continuous growth with little recovery time. As we’ve previously mentioned in our blog on transplanting, maintaining the right conditions—especially after any form of stress—helps ensure your plants bounce back quickly and develop strong root systems to support larger yields.

High-Stress Training (HST): Pushing for Bigger Yields

For those seeking even larger yields, high-stress training (HST) involves more aggressive manipulation of the plant. HST techniques like topping, super cropping, and mainlining involve deliberately stressing the plant by cutting or crushing parts of it to force new growth.

Topping:

Topping is the process of removing the main growing tip of the plant, which encourages the plant to develop multiple colas rather than focusing on one dominant bud. This technique is perfect for controlling vertical growth and spreading the plant’s energy across several bud sites.

How to Top Cannabis Plants:

Use sterilised pruning shears to cut off the main growing tip after the plant has developed at least 4–5 nodes.

The plant will respond by growing two new shoots from where the cut was made, doubling the number of potential colas.

What is F’imming

F’Im standings for “F – I missed” Which is a technique that has now been incorporated in some growers plant yielding toolkit. Instead of topping, he first notice of this was when growers cut the main grow point in half or just above half. Instead of removing the main node itself. This slows the main growing process like with topping but also lets it continue to grow from that main point once that side branches grow out. F’imming promotes more lateral growth.


maximise your yield with cannabis training

Super Cropping:

Super cropping involves crushing the stems of your cannabis plant to increase hormone production and redirect energy to other parts of the plant. This technique not only increases resilience but also promotes larger yields by exposing more bud sites to light.

How to Super Crop:

Identify the branch you want to manipulate.

Gently crush the stem between your thumb and fingers until it becomes pliable, then bend it over and tie it down.

Both HST and LST are great for maximising yields, but keep in mind that high-stress techniques require a longer recovery time. As mentioned in last week’s blog, cannabis plants are highly resilient, but ensuring the right care post-training is essential for preventing unwanted stress or damage.

Techniques for Small Grow Spaces: SOG and ScrOG

For growers working with limited space, techniques like Sea of Green (SOG) and Screen of Green (ScrOG) are highly effective. These methods focus on optimising canopy development, ensuring that even in tight quarters, your plants receive the right amount of light and airflow.

Sea of Green (SOG):

SOG involves growing many small plants close together and flipping them into the flowering stage earlier than usual. This method encourages faster harvests with smaller, but more frequent yields. Since the plants stay compact, it’s ideal for growers with height restrictions.

Screen of Green (ScrOG):

In ScrOG, a trellis net is used to spread the plant’s canopy horizontally. As the branches grow through the net, they are tied down to maximise light exposure across all bud sites. This technique requires more maintenance but delivers larger yields per plant, making it perfect for maximising space.

maximise your yield with cannabis training

Choosing the Right Training Method

Choosing between low-stress training and high-stress training depends on your grow space, experience, and goals. If you’re new to cannabis cultivation, starting with LST may be the best option. It’s a simple way to control plant growth without risking damage. On the other hand, if you’re an experienced grower looking to push your plants to their limits, high-stress techniques like topping and super cropping can lead to impressive yields when done correctly.

No matter which method you choose, remember that the health of your roots plays a crucial role in how well your plants respond to training. As we discussed in previous posts about plant health and root development, healthy roots lead to stronger plants and, ultimately, better yields.

Train for Success

By using plant training techniques, you can control the shape and size of your cannabis plants, maximise light exposure, and boost your overall yields. Whether you’re working with limited space or just looking to get the most out of your grow, methods like LST, HST, SOG, and ScrOG provide you with the flexibility to tailor your grow setup to your needs.

As always, make sure you’re working with healthy plants and the right tools for the job. Proper plant training is an investment in time a

Posted on

Why Transplanting Matters for Cannabis Plants

why transplanting matters for cannabis plants

In last week’s blog, we explored the importance of male cannabis plants and their role in breeding and genetic preservation. This week, we’re shifting our focus to a critical practice that can make or break your harvest—transplanting. Knowing when and how to transplant your cannabis plants can significantly affect their overall size and yield. After all, the saying goes, “The size of the roots equals the size of the fruits.”

Healthy roots lead to stronger plants, bigger flowers, and, ultimately, a more successful harvest. Whether you’re growing cannabis in soil, coco, or even a single-size rockwool cube, understanding the transplanting process can help you maximize the potential of your crop.

why transplanting matters for cannabis plants

Why Is Transplanting Cannabis Plants So Important?

Transplanting is essential for giving your plants the room they need to develop healthy and expansive root systems. In solid mediums like soil or coco, cannabis roots can become root-bound—when roots have grown to the point of encircling the inside of the pot, limiting further growth. Root-bound plants will slow down in vegetative growth, which in turn limits their ability to produce large, resinous buds. 

By transplanting your cannabis plants into larger containers at key points in their growth, you allow the roots to spread out, absorb more nutrients, and support bigger plants with more abundant yields.

How Often Should You Transplant Cannabis Plants?

Generally, you’ll want to transplant your cannabis plants 2–3 times during their life cycle. While some growers prefer to plant directly into larger pots, this can lead to waterlogging and overwatering issues, especially early on. Smaller pots allow for faster root development, but eventually, your plants will need more space. Its important to increase the size of the pot relative to the growth expected of the plant too. To transplant into a slightly bigger pot will not help and will be counter productive to the growth of your plant. 

Seedlings and Early Vegging: Start in small seedling pots or solo cups. Transplant when your plants develop at least three nodes. Some growers will even top their young vegging plants in these smaller pots to ensure they get the growing structure they want. 

Vegetative Growth: Move your plants into larger pots, around 11–19 litres (25–30 cm in diameter). Keep them in this pot until they’ve roughly doubled in size. To avoid root-bound in this phase of the plant’s life is crucial. So ensuring that you monitor your plant’s growth patterns is important. Once growth stagnates, consider your last transplant. 

Final Pot: Before flowering begins, transfer your plants to their final pots, typically around 38–60 litres, depending on how large you want your plants to grow. Remember that your plants will rapidly expand in growth again during this transition period, so it is important to maximise your efforts at this point. You can even plant your cannabis into the ground if this will give you better-maximising potential towards the end. When doing this, consider all the other things we discussed with the soil food web, soil conditioning and soil preparation as a whole.

For photoperiod strains, this transplanting schedule ensures that the roots have enough room to develop without becoming constrained, while also minimizing the risk of transplant shock.

Here is a table to help you figure out some basics around pot sizes.

Why transplanting matters for cannabis plants

Can You Grow Cannabis in a Single-Size Rockwool Cube?

Interestingly, cannabis can be grown in a single-size rockwool cube without the need for multiple transplants. Rockwool provides an optimal air-to-water ratio for root growth, allowing plants to thrive even when the cube remains the same size throughout the growth cycle. However, rockwool’s porous nature means that precise control of watering and nutrient levels is critical. In commercial growing operations, Rockwool is often the ideal medium selected due to its size. Allowing for high production, less cost and little to no dirt. 

While this method is convenient and reduces the need for re-potting, it’s important to monitor your plants closely. Make sure that the roots don’t become too constricted within the cube, and adjust your watering to avoid issues like waterlogging or root rot.

Why transplanting matters for cannabis plants

How to Transplant Cannabis: Step-by-Step Guide

Transplanting cannabis is a delicate process, and taking extra care during the transition will minimise transplant shock. 

Prepare your new pot: Fill it with fresh, high-quality soil, leaving enough room to fit the plant’s current root ball. What I normally do is, I will take the current pot the plant is in and place it inside the bigger pot I am transplanting in. Filling the soil around it. This ensures that you have enough room for the plant exactly. Just make sure you don’t plant it too deep in the new pot. 

Water your plant: A day or two before transplanting, water the plant to make it easier to slide out of its current pot. You don’t want completely moist soil. This will break more easily and cause more harm. You do not want the soil dry Either. So consider your watering schedule and transplanting.

Remove the plant: Gently tip the plant and pot upside down, supporting the root ball with your hand. Avoid pulling on the stem to prevent root damage. You can try squeezing gently onto the pot first to loosen the root ball from the pot too 

Transplant carefully: Place the plant into the new pot, and fill in the remaining space with soil. Lightly press down to secure the plant. When doing this step. It’s important to inspect the roots of the plant. It’s not often that you get to do this so it’s important to have a look. Are they nice and white, are they dark brown and dead?
You might want to consider pruning some dead roots off if you see some. This will also help promote and stimulate newer growth. What I personally like to do is gently break the bottom of the root ball open to help the roots grow into the new soil or pot. Just a tip I learnt from an old farmer. 

Water again: Water the plant lightly to help it settle into its new environment.

why transplanting matters for cannabis plants

What About Autoflowering Cannabis?

While photoperiod cannabis strains benefit from multiple transplants, auto-flowering cannabis should ideally be planted directly into its final pot. Autoflower strains flower based on age, not light cycles, so the stress from transplanting can slow their growth and reduce yields. To a point that the entire grow will flop. There is very little room for error with auto-flowering cannabis. Their cycles are so short that the risk of transplanting is not something growers are urged to take.  If you must transplant an auto-flower, do so early, and be extremely careful to minimize stress on the roots.

Transplanting for Bigger Yields

In cannabis cultivation, the size of the roots truly does determine the size of the fruits. Healthy, expansive roots allow your plants to absorb more nutrients, grow larger, and ultimately produce bigger flowers. Whether you’re growing in traditional pots or a single-size rockwool cube, understanding how and when to transplant your cannabis plants is key to maximising your yields.

When you get into the flow of cultivating transplanting becomes a fun activity you look forward to. It is that little bit of time you get to fully get your hands dirty again during all the monitoring and oversight periods of cultivation.

why transplanting matters for cannabis plants
Posted on

Male Cannabis Plants: A Breeders Secret Weapon

Male cannabis Plants

In our previous discussion on cannabis plant propagation, we explored how cloning can preserve genetic consistency and streamline your growing process. Today, we’re shifting our focus to an often misunderstood yet vital aspect of cannabis cultivation: male cannabis plants. While traditionally overlooked due to their lack of flower production, male cannabis plants play a critical role in breeding and preserving the genetic diversity of this plant. In fact, their value has grown among home growers and breeders who wish to create unique strains and preserve heritage genetics.

What Are Male Cannabis Plants?

Cannabis plants are dioecious, meaning they have separate male and female individuals. Unlike their female counterparts, which produce the cannabinoid-rich flowers prized by consumers, male cannabis plants produce pollen sacs that fertilise the female plants. This fertilisation results in seed production, rather than the dense, smokable buds that growers and consumers usually seek. However, when used in a controlled environment, male cannabis plants offer a range of benefits for both breeding and cultivation.

Male Cannabis Plants

Why Male Cannabis Plants Matter in Breeding

In cannabis cultivation, maintaining a strong genetic pool is essential for producing healthy, potent plants with desirable characteristics. Male cannabis plants are indispensable for breeders who wish to cross strains and create new hybrids. By selecting strong, disease-resistant males with favourable traits, breeders can influence the next generation of cannabis plants to exhibit specific qualities. It is important to note that male plants are considered to be the most dominant genetic transferer. This means the next generation will most likely be more influenced by the male plant than the female. These include things like:

Terpene profiles: Male plants can pass on unique flavours and aromas to the next generation. You will often see male plants are more fragrant while being in a young veg phase. These young male plants can even have visible terpene oils on their stems. 

Growth patterns: Male plants generally have a rapid growth rate compared to their female strain counterparts. This must not mislead the understanding here. Things like node space, leaf-to-calyx ratio and overall growing patterns are what an ideal male will transfer over in a desired breeding program. 

Cannabinoid profiles: Although male plants produce lower levels of cannabinoids like THC, they can still contribute to a well-rounded cannabinoid profile in their offspring.

For breeders, male cannabis plants are essential for preserving rare genetics and experimenting with strain creation. They help create new strains with unique effects, aromas, and flavours and allow cultivators to maintain a vibrant gene pool, avoiding inbreeding and genetic weakening.

Male Cannabis Plants

The Debate: Pollen Chucking and Unintended Pollination

The rising popularity of male cannabis plants, especially among home growers and amateur breeders, has sparked a significant debate in the growing community. While breeding is an exciting way to create new strains, improper pollen handling—often referred to as “pollen chucking”—can lead to unwanted pollination. I have written about this in the past, so check that out too. Because I argue that every breeder started off by chucking pollen. And that perhaps this is a natural part of the process. Go read the blog and let me know… Regardless, this is a major concern for neighbouring growers, as male plants can pollinate female plants nearby and afar, resulting in seed-laden flowers instead of potent, seedless buds.

Growers must ensure that male cannabis plants and their pollen are handled in tightly controlled environments to prevent accidental pollination. One stray pollen sac could compromise entire crops in nearby gardens. This debate has led to discussions on ethical breeding practices, emphasising the importance of keeping male plants and their pollen isolated unless the grower is intentionally breeding. If that’s natural or not and if something should be done.

A New Market: Pollen for Sale

As the cannabis market continues to evolve, so does the demand for male cannabis plants and their pollen. Today’s breeders and home growers can now purchase cannabis pollen much like seeds, directly from breeders focused on preserving genetics and creating unique flavours. This new market caters to breeders who want to explore new strain combinations or preserve the genetics of rare or heritage strains without having to grow and maintain male plants themselves.

By sourcing pollen from reputable breeders, growers can ensure they are using high-quality genetics. It allows for precise control in breeding projects and reduces the risk of hermaphroditic traits and weak genetics that can result from uncontrolled pollination. This is just another amazing showcase of how a group of motivated and skilled cannabis professionals can unlock a new potential given the obstacles that arise. Our industry is booming because of these types of things. Innovation is driven and solutions that benefit growers, smokers and medical patients alike are created. This really makes me happy.

Other Benefits of Male Cannabis Plants

Aside from their vital role in breeding, male cannabis plants offer several additional benefits to your garden:

Pest control: Male cannabis plants, though lower in terpene content than females, still release natural fragrances like limonene, borneol, and pinene. These terpenes act as natural insect repellents, helping to protect your crops from pests. 

Fertiliser: Because males are so fast growing too they possess slightly more growth hormones than females. When growers cull the males, they can make Fermented plant juice with it. 

Soil enrichment: Male cannabis plants have extensive taproots that can help improve soil quality by increasing the absorption of water and nutrients. After they’ve served their purpose in breeding, they can be composted or mulched to provide micronutrients to your garden.

Male Cannabis Plants

Don’t Overlook Male Cannabis Plants

While male cannabis plants may not produce the smokable buds most growers desire, their importance in breeding, genetic preservation, and overall garden health cannot be overstated. For those interested in creating new strains or preserving genetics, male plants offer a world of possibilities. However, it’s essential to handle male plants responsibly to prevent unintended pollination and protect neighbouring gardens.

It is striking how many cannabis users don’t know that there is a difference between male and female cannabis plants. So please share this with whoever can benefit from it. It is important for us all to do our part and educate the community around us. I hope That you have enjoyed our ‘How to Grow’ series up until this point. 

Please leave a comment below. All feedback is welcomed.

Posted on

Cannabis Plant propagation

Cannabis Plant propagation

This grow series has started to take shape. We have discussed the most basic concepts and have transitioned into an organic look and approach. Today I want to focus on something else. In previous blogs, I have touched on the topic slightly but never really dedicated time to discussing the concepts you need to consider. 

If you’re looking to grow a consistent, high-quality cannabis crop, mastering the art of plant propagation is essential. Plant propagation, specifically cloning, is a popular and rewarding method for maintaining genetic consistency and keeping your favourite strains alive. I believe it is a skill set that comes with passionate growers and those who truly want the best cannabis. Because you will make a plan to keep what is considered a ‘Cash Crop.’

What is Cannabis Plant Propagation?

In essence, the most common plant propagation technique used is cloning. A simple yet effective way to create ‘new’ cannabis plants from the existing plant. Referred to as the Mother plant. Cloning allows growers to make an identical copy of the mother plant, allowing for the expansion of the same genetics to either increase yields – growing more of the exact same plant, preserve the genetics of the plant or even start up a nursery of dank you know others would love. 

For cannabis growers, propagation through cloning offers several advantages:

Consistency: Each clone will produce similar yields and quality, as they are genetic replicas. When the cuttings are taken at the optimal time the genetic preservation is kept. Clones give those who need consistency in their yields that the market appreciates more than anything.

Cost-Effective: Most home growers really benefit from this. Because budget and funds are usually tight for growing cannabis. Clones offer home growers the chance to know what they will get as well as provide them with a continuous growing cycle if the propagation is done consistently within the right timeframes. Yes, you won’t have variety but it is also cheaper to buy a clone than to purchase seed.

Speed: Clones root faster than seeds germinate, allowing for quicker harvests. This cannot be underestimated. Some growing methodologies like the indoor Sea of Green. Allows growers to take harden-off clones, give them a week of veg light and then flip them straight into flower. This can cut down grow time by many many weeks.

Cannabis plant propagation

Best Methods for Cannabis Plant Propagation

There are two primary methods of cannabis propagation: Vegetative Propagation (Cloning) and Tissue Culture.

Cloning

The most common method for cannabis propagation is vegetative cloning. This involves taking a cutting from a healthy mother plant and encouraging it to grow roots. You want to ensure that your mother plant is in a matured vegetative phase. Cutting from young vegging plants will work too, but your chances of stunting the growth of the plant will be higher. Or at least the amount of clones you can take will be less. Be mindful of where on the plant you select to cut. Not all Clones are cut equally. The higher up on the plant the more supple the stems will be as well as the concentration of growth hormones. While cutting from lower down on the plant might give a slower rooting clone, it will be harder in the stem which can produce a more robust plant from the get-go. Great for clones going outdoors.

Steps for Successful Cloning:

Select a healthy mother plant: Ensure the plant is disease-free and has strong genetics.

Prepare your cutting: Choose a healthy branch with strong growth tips. Cut at a 45-degree angle just below a node.

Apply rooting gel: Dip the cutting in the rooting gel to seal the cut area and encourage root growth.

Plant the cutting: Place the cutting into a moist, pH-balanced starter cube and keep it in a propagation tray with high humidity.

Monitor and mist: Spray the cuttings daily to keep them hydrated. Rooting typically occurs within 7–10 days.

Cloning is a simple and reliable way to propagate cannabis, but maintaining the right environmental conditions—consistent humidity, temperature, and lighting—is critical for success. Many growers fail to keep things in check which causes the attempts at cloning to fail. 

Today, our markets are so sophisticated that we need not look further than our local grow shop to get all the supplies we need. But things like cloning gels are also not really a need. You can use Aloe vera, honey, Cinnamon or even just nothing. It’s more important to ensure that once you have cut the clone you do not let air into the bottom of the cut. So to stick it in the water is much better. Then thereafter, put it in rooting gel etc…

Tissue Culture Propagation

Tissue culture is a more advanced method of cannabis propagation. Instead of taking cuttings, this method involves culturing cells or tissue in a sterile environment. Tissue culture allows for the rapid production of many clones from a single plant in a small area, which is especially beneficial for large-scale growers. The protocols around Tissue Culture can vary from strain to strain which has made it challenging to create an effective home use out of this technology for now. So it is no surprise that only high-tech medical facilities consider this technique. You can propagate thousands of plants from some small pieces of tissue. It’s rather crazy science.

Cannabis Plant propagation

Best Time to Plant Clones

The timing of planting cannabis clones is critical for successful growth. It’s best to plant your clones once they’ve developed a strong root system, which typically happens after 7–14 days in the propagation tray. The ideal time to plant is during the vegetative growth phase when your environmental conditions are optimized for root and stem development.

Avoid planting clones too early, as they may not have strong enough roots to survive the transplant process. Ensure that temperatures are stable, and your lighting and humidity levels are well-regulated to avoid transplant shock. You can also start by transplanting into smaller containers and allow for the roots to be established in this fashion.  Sticking a tiny clone directly into the soil outside will not be the way to go. Be mindful of that.

Common Mistakes to Avoid in Cannabis Plant Propagation

Overhandling cuttings: Once your cuttings are placed in their propagation cubes, avoid touching or moving them frequently, as this can damage delicate root systems. The process needs to be done effectively and swiftly. When you take your cuttings make sure all your tools are in the right place. Ready to go. The French would say, “Mise en place”

Poor sanitation: Always sterilize your tools and work area to prevent the spread of disease. Clones are so vulnerable to dying that this cannot be overlooked. Keep everything clean.

Inconsistent environmental conditions: Clones need stable humidity, light, and temperature. Fluctuations can hinder root development. Causing clones to be yellow and look thin.

Clone Count: Don’t overcrowd your propagation trays. Often growers take too many clones and try and fill the propagation trays to the brim. This causes issues when the cuttings are moist from mist and are touching one another.

cannabis plant propagation

Why Clones Can Be an Easier and More Rewarding Approach

Cloning is often considered easier than growing cannabis from seeds, especially for cultivators aiming for consistency. It’s hard sometimes to nurture something from the start during its most delicate times. Let’s also be realistic. Not everyone has the time to germinate and care for young seedlings. So investing in some sound genetics and clones can take the headache away. You know the quality to be expected as the genetic is a copy of the mother. 

When growing from seed there are many surprises that can easily challenge your skills. Although, there are challenges they are not as difficult with clones. Making the reward for the cannabis flowers so much better. When home growers invest in clones from sound nurseries. It’s almost a guarantee they will stick to it because of the ease into the growing transition it provides.

Cannabis Plant propagation

Mastering Cannabis Plant Propagation

All growers in my opinion must learn this skill. There will come a time in your growing cycle when you find a plant that is just so exceptional that you cannot just let it go. To have this skill set in our tool kit as a grower has allowed us to keep genetics alive for a very long time.  

I hope this encourages you this season to try to take your own clones and or invest in them this season to make things a bit easier and more rewarding.

Posted on

Integrated Pest Management in a nutshell

integrated pest management

Last week, we explored Korean Natural Farming (KNF) techniques, including how to make Effective Microbe solutions (EM-1) and fermented plant juices. Now, let’s dive into how these methods, along with an effective Integrated Pest Management (IPM) system, can protect your cannabis plants from pests naturally.

What is Integrated Pest Management (IPM) for Cannabis?

Simply put, Integrated Pest Management (IPM) is a proactive, eco-friendly approach to pest control that revolves around protecting your cannabis plants throughout their growing period. Rather than relying on harsh chemicals, IPM combines various strategies, including companion planting, beneficial insects, natural sprays, and preventive measures. This holistic system prioritizes plant health, reduces environmental damage, and helps build long-term resilience in your garden.

Now don’t get me wrong. Some farmers today still rely on the use of pesticides and harsh insecticides in order to solve their pest issues. As effective as they are, we have learnt and have seen the damaging effects on the water, soil and health of people this has had. So please pardon me that I don’t discuss things like Pyrol, Eco oil SK etc. I am not against the use of these compounds as I have used them in the past and still make use of some of them when I really need to. An example of this would be Potassium Scilicate. An inorganic compound that is apart of my IPM and I will explain why later.

Integrated Pest Management

Getting Started with Companion Planting: The Foundation of IPM

One of the simplest and most effective ways to begin your IPM journey is by incorporating companion plants. Cannabis, while valuable to humans, is also highly attractive to pests. Companion planting can help deter harmful insects while attracting beneficial ones. Your garden will thrive once you have a balance in nature. So with this, there needs to be a sense of awareness from the farmer that there will be pests but there will also be predators. And having a balance is what we are aiming for. 

Popular companion plants for cannabis include:

Marigolds: Known to repel nematodes and aphids.
Garlic and onions: Their strong scent drives away many insects.
Basil and mint: These herbs repel flies and mosquitoes while enhancing flavor when grown near cannabis.
Chamomile and lemon balm: Attracts beneficial pollinators while repelling pests like aphids.

These plants not only assist with pest control but can also be used to create fermented plant juices or Oriental Herbal Nutrients (OHN) for plant health, utilising your EM-1 solutions.

integrated Pest Management

Introducing Natural Predators: Your Garden’s Tiny Guardians

While companion planting lays a solid foundation, introducing beneficial insects can take your IPM strategy to the next level. These insects act as your garden’s natural pest controllers, maintaining a balanced ecosystem. Here are a few garden-friendly bugs you’ll want to invite:

Ladybugs: These beetles are aphid-eating machines.
Lacewings: Both adults and larvae feed on a variety of soft-bodied pests like caterpillars and aphids.
Praying Mantises: These predators will consume just about any insect they can catch, including larger pests.
Parasitic Wasps: Though tiny, these wasps play a crucial role in pest control by laying their eggs inside destructive insects.

To ensure these beneficial insects stick around, provide them with food, water, and shelter. Companion plants like chamomile and basil create the perfect habitat for these valuable predators. Another solution can also be to buy them as you need or see fit. The predator insect market has boomed over the last 5 years opening up once an agricultural elite IPM treatment to the average Joe like you and I. Companies like Koppert have done an amazing job by even offering pheromones for specific insect trapping too.

integrated pest management

Preventive Measures: Building a Strong Defense

Prevention is key when it comes to pest management. It sometimes can seem extreme to take action on something that doesn’t require any work. But when it comes to your cannabis. This approach is best. Just the basics in garden ethics can also be considered being proactive.

Proper Sanitation: Regularly clean your growing area, removing dead leaves, debris, and any infected plants to reduce the risk of pest infestations. A clean grow area will do more than just look good to the eye. It will help reduce risk of mould and diseases.

Regular Inspections: Make daily inspections a habit. Catching pests early can prevent a full-scale infestation. But also take note. That seeing One or two of something doesn’t always call for an intervention. So while inspecting be aware of the sizes of the things you see and learn what is too much. You don’t want to wait till things are overboard before you intevine. 

Quarantine New Plants: Always quarantine any new plants before introducing them to your main garden to avoid cross-contamination. This is something you must consider when bringing clones in from a new space to plants already in your space. It is normally advised to seperate them and treat the new plants before bringing them into the fold.

Natural Sprays and Solutions: These are usually things that can take long to take effect compared to an insecticide like Pyrol. But consider adding an amazing KNF solution called JADAM wetting agent to your solutions of oriental herbal nutrients. Jadam as been proven to suffocate insects and because of its properties allows for better application of all sprays and solutions.

integrated pest management

If pests do make an appearance, you can fight back with natural solutions that are safe for both your plants and the environment. Here are a few simple DIY recipes you can try:

Neem Oil Spray: Mix 1 teaspoon of neem oil and ½ teaspoon of liquid soap with 1 quart of warm water. This all-purpose spray combats a wide range of pests like aphids, spider mites, and whiteflies.

Garlic-Pepper Spray: Blend 2 hot peppers and 1 whole bulb of garlic with 1 quart of water. Strain and spray this mixture to deter insects like caterpillars, aphids, and beetles.

Diatomaceous Earth: This powder, made from fossilized algae, works by physically damaging the exoskeletons of crawling insects. Dust it around your plants for effective pest control.

AQ sf (Ampelomyces Quisqualis): an Indigenous fungal isolate to South Africa, and a hyper parasite to the common Powdery Mildew. Mixed in with a water or JADAM solution.

Potassium Silicate: Fills the cellular gaps within the plant wall structure, allowing for a more robust in-the-wind plant as well as a plant with tougher skin for insects to bite into. As well as making it extremely undesirable for fungus to thrive, so it also takes care of powdery mildew.

Creating Your IPM Schedule: Consistency is Key

A successful IPM system requires regular maintenance and monitoring. You can easily avoid massive issues by just doing the following:

Daily: Perform visual inspections of your plants for any signs of pests or disease.

Weekly: Apply preventive sprays, rotating between different natural solutions to avoid resistance.

Bi-weekly: If you’re using beneficial insects, release them into your garden at this frequency.

Monthly: Conduct a deep clean of your grow room or garden area to reduce pest hiding spots.

Integrated Pest Management is more than just controlling pests—it’s about building a sustainable ecosystem that promotes plant health and resilience. Your Will will be tested as a grower every season. Pests and diseases are often what collapse what seemed to be a perfect grow. So take the time to develop your IPM based on the previous season’s experience. And if you are brand new, take time to go into your garden and assess what is going on. Are there any issues already and what can you do to take measures against it now before you grow your cannabis in the space? A strong IPM strategy not only ensures a bountiful harvest today but sets you up for success in future growing seasons.

Posted on

Cannabis Seeds: How They Work And Differ

Cannabis Seeds: How They Work And Differ

Selecting the correct genetics in your cannabis cultivation journey can be tricky. It is important to grasp the basics of cannabis seeds before making the crucial error that most do. Spend before they might not need to. Today we will discuss cannabis seeds how they work, and the various types there are. Your decision will greatly affect your results.

The Basics of Cannabis Seeds

Cannabis seeds are typically oval-shaped seeds, roughly 3-4mm long and 1.5-2mm wide. A mature cannabis seed will have a healthy seed coat. The skin of the seed will be defined (some call it tiger stripes). Over the years, due to genetic breeding, I have seen well-defined Albino-looking cannabis seeds too. So it is not always that they will have defined stripe patterns. Look at the overall seed health. For most growers, seeds will make up the foundation of their cultivation experience. There are very few growers who start with clones and only stick to that. What most growers love about seeds is that they have greater potential to grow healthier, robust plants.

Cannabis Seeds: How They Work And Differ

The Anatomy of a Cannabis Seed

The outer layer known as the seed coat protects the inner embryonic plant material. The seed coat has been suggested to need more in-depth study. As some scientists believe it does more than just protect and prevent germination.

On the inside of the seeds you can find a substance called albumen, which is a nutritional reserve that keeps the embryo healthy until germination; it’s also the seed’s initial source of energy once it begins germinating. Now, for the centre of the seed, home to the precious embryo from which your new plant will grow from. It contains the plant’s genetic code alongside four other parts; the radicle, the hypocotyl, cotyledons and gemmules(The apical meristem or the growth region that will develop into the plant’s shoots). The radicle is the embryonic root; this is the part of the seed where roots come from. The hypocotyl is known as the embryonic stage, and the cotyledons are in charge of those first few leaves that you can see once the seed germinates.

During germination, water absorption triggers the development of the radicle, marking the beginning of the seed’s transformation into a mature plant. So many growers have struggled over the past to germinate seed successfully that there are kits to assist in this process. It seems odd that not everyone can do the basic seed sprouting we learned as kids in school. Or maybe we seem to have just been so far disconnected from growing that this process has become a niche in the industry on its own. Available on the market today; are basic germination kits and even sophisticated Aruora devices.

Cannabis Seeds: How They Work And Differ

Feminized vs. Regular Cannabis Seeds: What’s the Difference?

When selecting cannabis seeds, Growers encounter feminized seeds and regular seeds often. Whether that is online or at your local grow shop. These are the standard options. Understanding the advantages and disadvantages of both can help you make a better decision for your growing objectives.

Feminized Cannabis Seeds

As the name suggests, feminized cannabis seeds are specially bred to produce exclusively female plants, or approximately 99.9% female. This is a significant advantage for most growers, as female plants are the ones that produce the cannabinoid-rich, resinous buds sought after for both recreational and medicinal use. In my opinion, newer growers that has the budget for these types of seeds should invest in them. They will help produce a standard plant that has been bred to produce exactly what it was meant for.  With less unpredictability in these genetics, you can focus more of your efforts in other aspects of the growing cycle.

Cannabis Seeds: How They Work And Differ

Advantages of Feminized Seeds

Higher Yield Potential: Since feminized seeds produce only female plants, every plant in your garden contributes to your final harvest. There’s no need to identify and remove male plants, which do not produce buds.

Simplified Cultivation: For beginners, feminized seeds remove the complexity of sexing plants and prevent the accidental pollination of female plants, which can reduce the quality and potency of your harvest.

Cost-Effective: By eliminating the possibility of male plants, growers can maximize the efficiency of their growing space and resources, leading to a more cost-effective cultivation process.

Disadvantages of Feminized Seeds

Limited Breeding Potential: Feminized seeds are not suitable for breeding, as they do not produce male plants necessary for creating new strains. Often also lacking strong pollination and genetic translations from the female plants due to their feminized make-up, in comparison to regular seeds.

Increased Risk of Hermaphroditism: Although rare, stress conditions during growth can cause feminized plants to develop both male and female reproductive organs, which can lead to self-pollination and seed production in your buds. This risk is also increased when the feminization process is not done in completely stable environments by more inexperienced breeders.

Regular Cannabis Seeds

Regular cannabis seeds produce a mix of male and female plants, with approximately 50% of each sex. These seeds are the traditional choice for breeders and experienced growers looking to create their own unique strains. Regular seeds offer you a new experience and thus it can be hit or miss. Most of the time growers will have to plant more seeds to find a more desirable phenotype to grow to full potential. They have been proven to be more resistant to moulds and diseases as these seeds often are climitized over growing cycles.

Advantages of Regular Seeds

Breeding Potential: Regular seeds are essential for those interested in breeding and developing new cannabis strains. The presence of male plants allows for the cross-pollination necessary to combine different genetic traits.

Viable Clones: Female plants from regular seeds are often considered more stable and resilient, making them ideal candidates for cloning. This also gives the nursery a unique market advantage as the phenotype will be different from others offering the same strain

Genetic Diversity: Regular seeds offer a broader range of genetic diversity, which can lead to more robust plants with unique characteristics.

Disadvantages of Regular Seeds

Sexing Required: Growers must carefully monitor their plants during the pre-flowering stage to identify and remove male plants, which can be labor-intensive and requires experience.

Space and Resources: Since approximately half of the plants will be male, growers need additional space and resources to accommodate the extra plants until they are sexed and removed.

Risk of Pollination: If male plants are not removed in time, they can pollinate female plants, leading to the production of seeds instead of high-quality buds.

Cannabis Seeds: How They Work And Differ

Autoflowering Cannabis Seeds: A Third Option

In addition to feminized and regular seeds, growers may also encounter autoflowering cannabis seeds. These seeds can be either feminized or regular, but they possess a unique trait that sets them apart from photoperiod strains: autoflowering plants begin to flower based on age rather than light exposure. This unique genetic trait is very tricky to breed into plants and thus we only advise to stick to breeders that only do auto-flowering genetics. A big misconception surrounding auto-flowering cannabis is that they ‘don’t need’ much light. And although there is some truth to this is must be stated that your results will not be as great as an auto-flowering cannabis plant that receives a normal light cycle. 

Advantages of Autoflowering Seeds

Faster Harvest: Autoflowering strains have a shorter life cycle, often completing their growth and flowering phases in a matter of weeks. This is ideal for growers looking for a quick turnaround. When managed correctly harvesting and planting can be come a set and collect type ordeal. 

Resilience: Autoflowering plants are generally more resilient to environmental stress and are less sensitive to light changes, making them easier to grow, especially for beginners. They are not as rewarding – so keep that in mind

Compact Size: These plants tend to be smaller and more discreet, which is advantageous for growers with limited space or those cultivating in stealthy locations. This is also genetically dependent these days. At first yes. But the auto-flowering niche has developed so much that you can find yourself with a 4-foot-tall plant. Don’t say I didn’t warn you.

Disadvantages of Autoflowering Seeds

Lower Yields: Autoflowering plants typically produce smaller yields compared to photoperiod strains, although advancements in breeding are gradually narrowing this gap.

Reduced Potency: Historically, autoflowering strains have been associated with lower potency, though newer varieties are showing significant improvements. This is almost not a disadvantage anymore. When we look at breeders like Fastbuds genetics and Mephisto genetics

Limited Control: Since autoflowering plants flower based on time rather than light cycles, growers have less control over the vegetative phase, which can limit the plant’s size and overall yield.

Which Seed Type is Right for You?

The choice between feminized, regular, and autoflowering seeds ultimately depends on your goals as a grower. For beginners, feminized seeds are generally the best option, offering an easier and more predictable path to a bountiful harvest. These seeds allow you to focus on mastering the basics of cannabis cultivation without the added challenge of sexing plants or dealing with male plants.

For those interested in breeding or exploring the genetic diversity of cannabis, regular seeds provide the necessary foundation for creating new strains. The ability to produce both male and female plants opens up a world of possibilities for those looking to innovate and experiment with cannabis genetics.

If you’re looking for a quick and easy growing experience with a fast turnaround, autoflowering seeds may be the way to go. Their resilience and short life cycle make them an excellent choice for those who want to see results quickly, even if it means sacrificing some yield and potency.

Posted on

Understanding Soil: The Foundation Of Outdoor Growing

Understanding Soil

Last week, I wrote about the most basic things you must consider when starting. It was an introduction to what I have determined to be a nuanced “how to” series. I will discuss things to make you more successful in your growing endeavours. There is no one way to skin a cat and there is just so much information so I will do my best during this growing season to stay in the ‘how to’ mode. So for the next few weeks expect nothing but growing content. With that being said. I want to Discuss Soil…

Understanding Soil

Identifying Your Soil Type

For those that will be going into the ground, or in raised beds and pots. It is of utmost importance to take more time prior to the growing season to prepare things. And know what you are working with. If it is your first time growing cannabis this season. You would want to start with identifying your soil type. This will allow you to best prepare the soil towards a more cannabis-friendly growing medium.

The main components of soil are dirt, minerals, organic matter and moisture. So to understand how you can best create amazing living soil, go in your backyard with a spade where you intend to grow and dig some ground up and have a look at it. Is it mainly sand, silt or clay? Is it a mixture?

Here is a picture of a soil triangle I always show people. You want to be in the Loamy centre. So by figuring out where you are, you can work your way towards the centre by adding the other components to your specific situation. If your soil is very clay mix in some sand, silt and organic matter to bring it towards the loamy centre.

Understanding Soil

Sandy Soil: This type is gritty to the touch and drains water quickly, which can be beneficial in preventing root rot. However, it may struggle to retain nutrients, so you’ll need to supplement with organic matter.

Clay Soil: Clay soil is dense and holds onto water and nutrients well, but it can become compacted, making it difficult for roots to penetrate. It also tends to dry out slowly, which can be a problem in wet climates.

Loamy Soil: Often considered the ideal soil type for gardening, loamy soil is a balanced mixture of sand, silt, and clay. It has good drainage, retains nutrients, and is easy to work with, making it an excellent choice for cannabis cultivation.

Silty Soil: Silty soil has a smooth texture and holds moisture better than sandy soil but may have drainage issues similar to clay soil. It’s rich in nutrients and can be improved with organic matter to enhance its structure.

To determine your soil type, you can perform a simple soil test by taking a small amount of damp soil and rubbing it between your fingers. Sandy soil will feel gritty, clay soil will feel sticky, and loamy soil will feel smooth and crumbly.

Preparing and Improving the Soil

Once you know what you are working with you can start preparing and improving the soil to create the optimal living soil and environment for your cannabis. Keeing in mind that cannabis thrives in equally bacterial and fungal soils it is important to hold a balance when going into preparation for the season.

Understanding Soil

Most home growers will never consider doing a soil test. But it is something I would recommend you do. There are various tools that can also assist in checking the Ph of the soil as well as the moisture content of the soil. These help a lot in determining how many amendments are required. For those that have been growing many seasons, It is something I highly recommend you do. It could save you lots of money during the season. Note that while the soil test can be affordable to some, most places charge for the interpretation of the data. This is where I would recommend you either sharpen your skills or pay the experts. 

Cannabis when grown in a living soil environment, correctly, has many natural buffers for the plants not to have imbalances in nutrients and things like that. But this does not mean that the grower shouldn’t be aware of what is going on too. – check out my piece on ‘pH doesn’t Matter’ for more on that.

Organic matter – This is a staple amendment in all growing. Whether it is compost from chicken or cow manures, food scraps like Bokashi or leaf mould. Organic matter is almost always added to any and all soil types. Sandy soil gets an increase in moisture retention, it helps loosen up clay soils and provides essential nutrients to loamy and silt soil.

Soil Aeration and water retention cannot be overlooked. Heavy clay soil can become water-locked. Adding things like, biochar, sand, perlite and vermiculite will improve drainage and water retention. It will also assist with Cation exchange. Which is essential for nutrient uptake in the plants,

Getting Ready to Plant

Due to the nature of outdoor organic growing. Growers should be proactive in preparation. Ensuring you condition your soil for growing is so important. It is pointless to prepare weeks ahead of time by mixing various things into your soil and then come time to plant, the soil is dry and not conditioned for growing.

Here is how I get all the life in the soil going before I put my cannabis in it. 

After letting the ground sit for a few days after I have amended it. I will add a cover crop to it. Something like red clover. This will start stimulating the soil. The exchanges between the bacteria, fungus and cover crop will start building this essential ecosystem for your cannabis.

Once my cover crop is growing I will start making my own Lactic acid bacteria, which I will pour into the soil too. I will add some earthworms and amend my last piece to the ground. For me, it is important to have a living soil that is actually alive and growing things before you add cannabis to it. I have noticed my cannabis thrives more on these types of grounds. If you disagree, please let me know what you do and how you go about it differently.

Understanding Soil

Mulching the soil will help too. This will help increase moisture retention as well as provide shade to the surface of the soil. Allowing for life to grow on the surface of the soil too. Increasing plant growth and health.

Whether you are transplanting or putting the seed directly into the ground. Make sure you give the ground enough time to break down nutrients from the compost and other amendments. Giving time for cover crops to crop and chop and grow will produce a more mature living soil in which the cannabis will thrive in. The soil food web is very important. A successful organic grower will always put the soil first. As it is the foundation on which the grow revolves around. 

When your soil is prepared and ready to go. Watering with the occasional activated compost tea will do wonders. 

It will make growing a breeze almost.