Posted on

Organic or Synthetic Nutrients: Which should you use?

Organic or synthetic nutrients

This week we will discuss Organic and synthetic nutrients. What the strengths and weaknesses of them are and how you can go about deciding which is best for you. When it comes to deciding and sticking to a nutrient regimen I have seen so many growers fall short of what they have planned for their grow seasons. Before you can decide, it is advised that you understand the basics of the fertigation regiment and how it will impact your growing methodology, scale and overall outcome of the flower.

Organic Nutrients

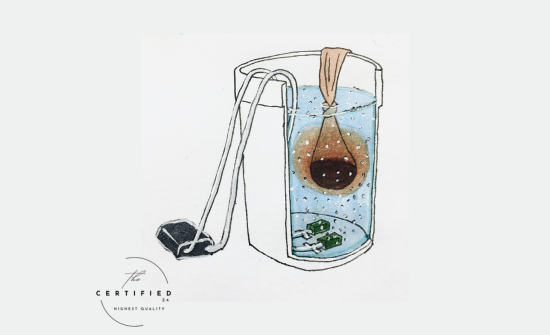
The term generally refers to some nutrient in its most natural state or raw form. Things like animal manure, compost, bone meal, seaweed etc. These generally take much longer to break down in the soil and have undergone little to no chemical processing. Some organic nutrients use fermentation to make nutrients more bioavailable to plants and soil food web as a whole.

Organic or Synthetic Nutrients

Advantages of Organic Nutrients:

Soil Health and Microbial Life: Organic nutrients support a thriving soil ecosystem by promoting beneficial microbes and fungi. These organisms help break down organic matter into forms that plants can easily absorb, creating a living soil environment. This results in healthier plants and a more resilient growing medium over time.

Flavour and Aroma: Many growers believe that using organic nutrients enhances the natural flavour and aroma of cannabis. Since organic growing mimics a plant’s natural environment, it often leads to a richer terpene profile, which directly impacts the taste and smell of the final product. I have not read any scientific papers on this but Most will swear that organic flower produces better entourage effects. Get in the comment section and let us know your opinion on the matter

Environmental Impact: Organic farming methods are generally more sustainable and environmentally friendly. By using renewable resources and avoiding synthetic chemicals, organic growers contribute to the health of the ecosystem, reducing pollution and soil degradation.

Lower Risk of Nutrient Burn: Organic nutrients are released slowly into the soil, reducing the risk of overfeeding or nutrient burn, a common problem with synthetic fertilizers. This mistake can easily be made by newer growers. But understand that in an organic setting nutrient burn and ‘hot soil’ can absolutely occur just as easily if one is just careless about adding amendments 

Disadvantages of Organic Nutrients:

Slower Nutrient Availability: Since organic nutrients need to be broken down by soil microbes before they can be absorbed by the plant, the effects may be slower compared to synthetic nutrients. This can be a disadvantage if you’re looking for rapid growth or if your plants are showing signs of deficiency that require immediate correction.

Inconsistent Nutrient Levels: Organic materials can vary in nutrient content, making it harder to precisely control the nutrient levels your plants receive. This can sometimes result in deficiencies or imbalances if not managed carefully. Something you need to be ok with. It is only until you create well-rounded soil and do testing to know the optimal level that you will be able to avoid these inconsistencies. Even with all the measures, it is just not as precise as the other method and I think this lack of control can cause growers to waste more money than they realize on things they don’t need but don’t know that they don’t need. 

More Labor-Intensive: Organic growing often requires more effort, from creating and maintaining compost to managing soil health. This can be time-consuming, especially for novice growers.

Organic or Synthetic Nutrients

Synthetic Nutrients – Salts

Synthetic mineral salts go by a few names, such as mineral fertilizers, mineral salts, synthetic fertilizers, synthetic nutrients or chemical fertilizers. As some of its names suggest, it’s not completely made up of natural compounds. It’s also worth noting that synthetic mineral salts are not the same as the likes of table salt or sodium chloride. Salts will react to water used to grow a plant and release its ionic nutrients, such as commonly used calcium nitrate and potassium phosphate. These are ionic compounds that plants love because it provides the necessary nutrients that it need to grow. Compared to organic fertilizers, synthetic mineral salts don’t need microbes or bacteria to mineralize or break down nutritional compounds in order to turn them into plant-available elements. In fact, plants don’t know the difference between organic and inorganic elements or plant food.

Organic or Synthetic Nutrients

Advantages of Synthetic Nutrients:

Immediate Results: Synthetic nutrients are water-soluble and can be quickly absorbed by the plant’s roots, leading to faster growth and quicker recovery from nutrient deficiencies. This makes them ideal for growers who need precise control over their plants’ nutrient intake.

Consistency and Precision: With synthetic nutrients, you know exactly what your plants are getting. They are formulated to deliver exact nutrient ratios, allowing for precise feeding schedules tailored to each stage of growth.

Ease of Use: Synthetic nutrients are generally easier to use. They often come with clear instructions and can be applied directly, without the need for composting or brewing teas. With the right tools, this becomes very simple and manageable. This can often lead to debates over powder or liquid fertilizer being better…

Disadvantages of Synthetic Nutrients:

Impact on Soil Health: Over time, synthetic nutrients can degrade soil health by killing off beneficial microbes and fungi. This can lead to a sterile growing medium that requires ongoing inputs to maintain plant health.

Environmental Concerns: The production and use of synthetic fertilizers contribute to pollution, including runoff into waterways that can harm aquatic life. Additionally, their overuse can lead to soil degradation and a dependency on chemical inputs.

Risk of Overfeeding: Since synthetic nutrients are highly concentrated, there’s a greater risk of overfeeding and nutrient burn. This can damage plants and reduce yields if not carefully monitored.

Carbon-integrated nutrients

An emerging trend in cannabis cultivation, combining the benefits of organic and synthetic nutrients with the added advantage of carbon-based compounds. These nutrients are designed to enhance plant growth by improving nutrient absorption and promoting overall plant health.

Carbon-integrated nutrients incorporate carbon-rich compounds, such as humic acids, fulvic acids, and other organic carbon sources, into the nutrient formula. These compounds act as natural chelators, binding to essential nutrients and making them more available to plants. The integration of carbon in nutrient formulas aims to optimize nutrient uptake, enhance soil structure, and stimulate beneficial microbial activity.

Organic or Synthetic Nutrients

Advantages of Carbon-Integrated Nutrients

Enhanced Nutrient Absorption: Carbon-rich compounds like humic and fulvic acids are known for their ability to chelate nutrients. This means they bind to essential elements, such as iron, magnesium, and calcium, making them more readily available to the plant’s roots. This can lead to improved nutrient uptake, resulting in healthier and more vigorous growth.

Improved Soil Health: Carbon-integrated nutrients contribute to the long-term health of your growing medium. They enhance soil structure by increasing organic matter content, which improves water retention, aeration, and overall soil fertility. This creates an environment that supports healthy root development and a thriving microbial ecosystem.

Stimulates Microbial Activity: The organic carbon in these nutrients acts as a food source for beneficial microbes in the soil. These microbes play a crucial role in breaking down organic matter, cycling nutrients, and protecting plants from pathogens. By promoting a healthy microbial population, carbon-integrated nutrients help create a more resilient and productive growing environment.

Compatibility with Both Organic and Synthetic Systems: Carbon-integrated nutrients can be used in conjunction with both organic and synthetic growing systems. This flexibility allows growers to incorporate the benefits of carbon-based compounds into their existing nutrient regime, whether they’re using organic amendments, synthetic fertilizers, or a combination of both.

Enhanced Plant Stress Tolerance: The presence of carbon-rich compounds can help plants better withstand environmental stresses, such as drought, temperature fluctuations, and nutrient imbalances. This is because carbon compounds can improve water retention in the soil and enhance the plant’s overall resilience.

Disadvantages of Carbon-Integrated Nutrients

Cost: Carbon-integrated nutrients tend to be more expensive than traditional organic or synthetic nutrients due to the added complexity of the formulation. For some growers, especially those operating on a tight budget, this cost may be a significant consideration.

Complexity in Use: While carbon-integrated nutrients offer numerous benefits, they can be more complex to use effectively. Understanding how these nutrients interact with your specific growing medium and environment may require additional knowledge and experience.

Organic or Synthetic Nutrients

How to Choose the Best Fit for Your Needs

Consider Your Growing Goals: If you prioritize sustainability, soil health, and superior flavour, organic nutrients might be the best choice. Organic growing is ideal for those who enjoy the process of nurturing a living soil and are patient with the slower pace of nutrient uptake.

If you’re focused on maximizing yields, achieving rapid growth, and maintaining precise control over your nutrient regime, synthetic nutrients could be more suitable. This option is often preferred by commercial growers or those looking for efficiency and consistency.

Think About Environmental Impact: If reducing your ecological footprint is important, organic growing is the way to go. However, there are ways to mitigate the environmental impact of synthetic nutrients, such as using them sparingly and combining them with organic practices like carbon-integrated nutrient solutions.

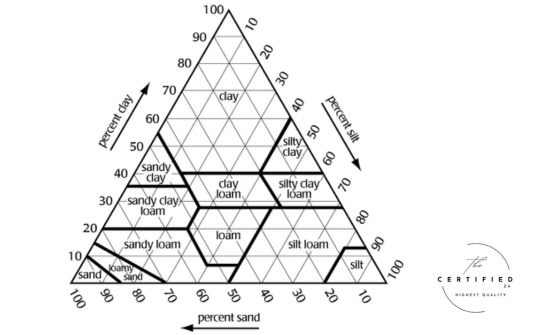
Consider the Growing Medium: Organic nutrients work best in soil or organic-based growing mediums that support microbial life. Synthetic nutrients, on the other hand, can be used in a variety of mediums, including hydroponics, where organic options are more limited. 

Most importantly, whatever you decide. Stick to it, too many times growers switch up their nutrient lines and methodologies during a grow cycle causing massive harm. Learn more this season as you grow and you will find that either organic or synthetic nutrients will work for you.

Posted on

Cannabis Seeds: How They Work And Differ

Cannabis Seeds: How They Work And Differ

Selecting the correct genetics in your cannabis cultivation journey can be tricky. It is important to grasp the basics of cannabis seeds before making the crucial error that most do. Spend before they might not need to. Today we will discuss cannabis seeds how they work, and the various types there are. Your decision will greatly affect your results.

The Basics of Cannabis Seeds

Cannabis seeds are typically oval-shaped seeds, roughly 3-4mm long and 1.5-2mm wide. A mature cannabis seed will have a healthy seed coat. The skin of the seed will be defined (some call it tiger stripes). Over the years, due to genetic breeding, I have seen well-defined Albino-looking cannabis seeds too. So it is not always that they will have defined stripe patterns. Look at the overall seed health. For most growers, seeds will make up the foundation of their cultivation experience. There are very few growers who start with clones and only stick to that. What most growers love about seeds is that they have greater potential to grow healthier, robust plants.

Cannabis Seeds: How They Work And Differ

The Anatomy of a Cannabis Seed

The outer layer known as the seed coat protects the inner embryonic plant material. The seed coat has been suggested to need more in-depth study. As some scientists believe it does more than just protect and prevent germination.

On the inside of the seeds you can find a substance called albumen, which is a nutritional reserve that keeps the embryo healthy until germination; it’s also the seed’s initial source of energy once it begins germinating. Now, for the centre of the seed, home to the precious embryo from which your new plant will grow from. It contains the plant’s genetic code alongside four other parts; the radicle, the hypocotyl, cotyledons and gemmules(The apical meristem or the growth region that will develop into the plant’s shoots). The radicle is the embryonic root; this is the part of the seed where roots come from. The hypocotyl is known as the embryonic stage, and the cotyledons are in charge of those first few leaves that you can see once the seed germinates.

During germination, water absorption triggers the development of the radicle, marking the beginning of the seed’s transformation into a mature plant. So many growers have struggled over the past to germinate seed successfully that there are kits to assist in this process. It seems odd that not everyone can do the basic seed sprouting we learned as kids in school. Or maybe we seem to have just been so far disconnected from growing that this process has become a niche in the industry on its own. Available on the market today; are basic germination kits and even sophisticated Aruora devices.

Cannabis Seeds: How They Work And Differ

Feminized vs. Regular Cannabis Seeds: What’s the Difference?

When selecting cannabis seeds, Growers encounter feminized seeds and regular seeds often. Whether that is online or at your local grow shop. These are the standard options. Understanding the advantages and disadvantages of both can help you make a better decision for your growing objectives.

Feminized Cannabis Seeds

As the name suggests, feminized cannabis seeds are specially bred to produce exclusively female plants, or approximately 99.9% female. This is a significant advantage for most growers, as female plants are the ones that produce the cannabinoid-rich, resinous buds sought after for both recreational and medicinal use. In my opinion, newer growers that has the budget for these types of seeds should invest in them. They will help produce a standard plant that has been bred to produce exactly what it was meant for.  With less unpredictability in these genetics, you can focus more of your efforts in other aspects of the growing cycle.

Cannabis Seeds: How They Work And Differ

Advantages of Feminized Seeds

Higher Yield Potential: Since feminized seeds produce only female plants, every plant in your garden contributes to your final harvest. There’s no need to identify and remove male plants, which do not produce buds.

Simplified Cultivation: For beginners, feminized seeds remove the complexity of sexing plants and prevent the accidental pollination of female plants, which can reduce the quality and potency of your harvest.

Cost-Effective: By eliminating the possibility of male plants, growers can maximize the efficiency of their growing space and resources, leading to a more cost-effective cultivation process.

Disadvantages of Feminized Seeds

Limited Breeding Potential: Feminized seeds are not suitable for breeding, as they do not produce male plants necessary for creating new strains. Often also lacking strong pollination and genetic translations from the female plants due to their feminized make-up, in comparison to regular seeds.

Increased Risk of Hermaphroditism: Although rare, stress conditions during growth can cause feminized plants to develop both male and female reproductive organs, which can lead to self-pollination and seed production in your buds. This risk is also increased when the feminization process is not done in completely stable environments by more inexperienced breeders.

Regular Cannabis Seeds

Regular cannabis seeds produce a mix of male and female plants, with approximately 50% of each sex. These seeds are the traditional choice for breeders and experienced growers looking to create their own unique strains. Regular seeds offer you a new experience and thus it can be hit or miss. Most of the time growers will have to plant more seeds to find a more desirable phenotype to grow to full potential. They have been proven to be more resistant to moulds and diseases as these seeds often are climitized over growing cycles.

Advantages of Regular Seeds

Breeding Potential: Regular seeds are essential for those interested in breeding and developing new cannabis strains. The presence of male plants allows for the cross-pollination necessary to combine different genetic traits.

Viable Clones: Female plants from regular seeds are often considered more stable and resilient, making them ideal candidates for cloning. This also gives the nursery a unique market advantage as the phenotype will be different from others offering the same strain

Genetic Diversity: Regular seeds offer a broader range of genetic diversity, which can lead to more robust plants with unique characteristics.

Disadvantages of Regular Seeds

Sexing Required: Growers must carefully monitor their plants during the pre-flowering stage to identify and remove male plants, which can be labor-intensive and requires experience.

Space and Resources: Since approximately half of the plants will be male, growers need additional space and resources to accommodate the extra plants until they are sexed and removed.

Risk of Pollination: If male plants are not removed in time, they can pollinate female plants, leading to the production of seeds instead of high-quality buds.

Cannabis Seeds: How They Work And Differ

Autoflowering Cannabis Seeds: A Third Option

In addition to feminized and regular seeds, growers may also encounter autoflowering cannabis seeds. These seeds can be either feminized or regular, but they possess a unique trait that sets them apart from photoperiod strains: autoflowering plants begin to flower based on age rather than light exposure. This unique genetic trait is very tricky to breed into plants and thus we only advise to stick to breeders that only do auto-flowering genetics. A big misconception surrounding auto-flowering cannabis is that they ‘don’t need’ much light. And although there is some truth to this is must be stated that your results will not be as great as an auto-flowering cannabis plant that receives a normal light cycle. 

Advantages of Autoflowering Seeds

Faster Harvest: Autoflowering strains have a shorter life cycle, often completing their growth and flowering phases in a matter of weeks. This is ideal for growers looking for a quick turnaround. When managed correctly harvesting and planting can be come a set and collect type ordeal. 

Resilience: Autoflowering plants are generally more resilient to environmental stress and are less sensitive to light changes, making them easier to grow, especially for beginners. They are not as rewarding – so keep that in mind

Compact Size: These plants tend to be smaller and more discreet, which is advantageous for growers with limited space or those cultivating in stealthy locations. This is also genetically dependent these days. At first yes. But the auto-flowering niche has developed so much that you can find yourself with a 4-foot-tall plant. Don’t say I didn’t warn you.

Disadvantages of Autoflowering Seeds

Lower Yields: Autoflowering plants typically produce smaller yields compared to photoperiod strains, although advancements in breeding are gradually narrowing this gap.

Reduced Potency: Historically, autoflowering strains have been associated with lower potency, though newer varieties are showing significant improvements. This is almost not a disadvantage anymore. When we look at breeders like Fastbuds genetics and Mephisto genetics

Limited Control: Since autoflowering plants flower based on time rather than light cycles, growers have less control over the vegetative phase, which can limit the plant’s size and overall yield.

Which Seed Type is Right for You?

The choice between feminized, regular, and autoflowering seeds ultimately depends on your goals as a grower. For beginners, feminized seeds are generally the best option, offering an easier and more predictable path to a bountiful harvest. These seeds allow you to focus on mastering the basics of cannabis cultivation without the added challenge of sexing plants or dealing with male plants.

For those interested in breeding or exploring the genetic diversity of cannabis, regular seeds provide the necessary foundation for creating new strains. The ability to produce both male and female plants opens up a world of possibilities for those looking to innovate and experiment with cannabis genetics.

If you’re looking for a quick and easy growing experience with a fast turnaround, autoflowering seeds may be the way to go. Their resilience and short life cycle make them an excellent choice for those who want to see results quickly, even if it means sacrificing some yield and potency.

Posted on

Understanding Soil: The Foundation Of Outdoor Growing

Understanding Soil

Last week, I wrote about the most basic things you must consider when starting. It was an introduction to what I have determined to be a nuanced “how to” series. I will discuss things to make you more successful in your growing endeavours. There is no one way to skin a cat and there is just so much information so I will do my best during this growing season to stay in the ‘how to’ mode. So for the next few weeks expect nothing but growing content. With that being said. I want to Discuss Soil…

Understanding Soil

Identifying Your Soil Type

For those that will be going into the ground, or in raised beds and pots. It is of utmost importance to take more time prior to the growing season to prepare things. And know what you are working with. If it is your first time growing cannabis this season. You would want to start with identifying your soil type. This will allow you to best prepare the soil towards a more cannabis-friendly growing medium.

The main components of soil are dirt, minerals, organic matter and moisture. So to understand how you can best create amazing living soil, go in your backyard with a spade where you intend to grow and dig some ground up and have a look at it. Is it mainly sand, silt or clay? Is it a mixture?

Here is a picture of a soil triangle I always show people. You want to be in the Loamy centre. So by figuring out where you are, you can work your way towards the centre by adding the other components to your specific situation. If your soil is very clay mix in some sand, silt and organic matter to bring it towards the loamy centre.

Understanding Soil

Sandy Soil: This type is gritty to the touch and drains water quickly, which can be beneficial in preventing root rot. However, it may struggle to retain nutrients, so you’ll need to supplement with organic matter.

Clay Soil: Clay soil is dense and holds onto water and nutrients well, but it can become compacted, making it difficult for roots to penetrate. It also tends to dry out slowly, which can be a problem in wet climates.

Loamy Soil: Often considered the ideal soil type for gardening, loamy soil is a balanced mixture of sand, silt, and clay. It has good drainage, retains nutrients, and is easy to work with, making it an excellent choice for cannabis cultivation.

Silty Soil: Silty soil has a smooth texture and holds moisture better than sandy soil but may have drainage issues similar to clay soil. It’s rich in nutrients and can be improved with organic matter to enhance its structure.

To determine your soil type, you can perform a simple soil test by taking a small amount of damp soil and rubbing it between your fingers. Sandy soil will feel gritty, clay soil will feel sticky, and loamy soil will feel smooth and crumbly.

Preparing and Improving the Soil

Once you know what you are working with you can start preparing and improving the soil to create the optimal living soil and environment for your cannabis. Keeing in mind that cannabis thrives in equally bacterial and fungal soils it is important to hold a balance when going into preparation for the season.

Understanding Soil

Most home growers will never consider doing a soil test. But it is something I would recommend you do. There are various tools that can also assist in checking the Ph of the soil as well as the moisture content of the soil. These help a lot in determining how many amendments are required. For those that have been growing many seasons, It is something I highly recommend you do. It could save you lots of money during the season. Note that while the soil test can be affordable to some, most places charge for the interpretation of the data. This is where I would recommend you either sharpen your skills or pay the experts. 

Cannabis when grown in a living soil environment, correctly, has many natural buffers for the plants not to have imbalances in nutrients and things like that. But this does not mean that the grower shouldn’t be aware of what is going on too. – check out my piece on ‘pH doesn’t Matter’ for more on that.

Organic matter – This is a staple amendment in all growing. Whether it is compost from chicken or cow manures, food scraps like Bokashi or leaf mould. Organic matter is almost always added to any and all soil types. Sandy soil gets an increase in moisture retention, it helps loosen up clay soils and provides essential nutrients to loamy and silt soil.

Soil Aeration and water retention cannot be overlooked. Heavy clay soil can become water-locked. Adding things like, biochar, sand, perlite and vermiculite will improve drainage and water retention. It will also assist with Cation exchange. Which is essential for nutrient uptake in the plants,

Getting Ready to Plant

Due to the nature of outdoor organic growing. Growers should be proactive in preparation. Ensuring you condition your soil for growing is so important. It is pointless to prepare weeks ahead of time by mixing various things into your soil and then come time to plant, the soil is dry and not conditioned for growing.

Here is how I get all the life in the soil going before I put my cannabis in it. 

After letting the ground sit for a few days after I have amended it. I will add a cover crop to it. Something like red clover. This will start stimulating the soil. The exchanges between the bacteria, fungus and cover crop will start building this essential ecosystem for your cannabis.

Once my cover crop is growing I will start making my own Lactic acid bacteria, which I will pour into the soil too. I will add some earthworms and amend my last piece to the ground. For me, it is important to have a living soil that is actually alive and growing things before you add cannabis to it. I have noticed my cannabis thrives more on these types of grounds. If you disagree, please let me know what you do and how you go about it differently.

Understanding Soil

Mulching the soil will help too. This will help increase moisture retention as well as provide shade to the surface of the soil. Allowing for life to grow on the surface of the soil too. Increasing plant growth and health.

Whether you are transplanting or putting the seed directly into the ground. Make sure you give the ground enough time to break down nutrients from the compost and other amendments. Giving time for cover crops to crop and chop and grow will produce a more mature living soil in which the cannabis will thrive in. The soil food web is very important. A successful organic grower will always put the soil first. As it is the foundation on which the grow revolves around. 

When your soil is prepared and ready to go. Watering with the occasional activated compost tea will do wonders. 

It will make growing a breeze almost.

Posted on

Growing Cannabis Outdoors: 7 Things To Consider When Getting Started

Growing Cannabis Outdoors: 7 Things To Consider When Getting Started

Every year, more and more people are exercising their constitutional rights as South Africans to grow their own cannabis. So often hard lessons are learned during the beginning stages that people get discouraged and never pick up growing a little bit of their own medicine for once. So here are 7 basic things to consider before you get started growing cannabis outdoors. 

  1. Assess your Growing Space

The first thing would be to assess and identify the best growing space. You want to find a space that is private and not visible to the public as well as not accessible to everyone. Cannabis is a cash crop and will always remain one. Remember that your available space will determine how many plants you can grow comfortably and which growing methodology to apply. 

It’s great to have cannabis growing and lots of it. Trust me I know… But you have to do your best not to overcrowd your space. This can cause airflow issues, leading to other issues like mould and plant diseases.

growing cannabis outdoors
  1. Evaluate the Grow Environment

Your growing environment is really important. A successful outdoor cultivator will always thank Mother Nature for a brilliant season. And pat himself/herself on the back for when she was tough on them. So consider the following:

Sunlight: We know that cannabis needs light to grow. But consider whether or not your space has enough sunlight and whether or not things like trees, buildings and street lights will influence your identified grow space. You want the most natural light exposure possible with as little obstruction as possible.

growing cannabis outdoors

Protection from the elements: Cannabis is a hardy plant. It has been shown to withstand extreme weather. But this won’t be ideal for Your cannabis. So consider the amount of rain, wind and overall temperature fluctuations the plants will experience. You might want to raise the plants off the floor if things can flood during the summer in your backyard. Just something to consider.

Pests and Pets: Most outdoor grows will be subjected to pests and diseases. It is the grower’s job to be proactive and keep and clean space as well as maintain plant health by having an Integrated pest management system in place. Companion planting, herbicide or bioactive measures can be put in place. Consider your animals, you might want to keep animals such as dogs and cats away from the cannabis plants as pet hairs can get into your flowers. They also can sometimes run around and destroy things… So consider this.

  1. Your Grow Medium

The grow medium you select is of extreme importance. It will help determine the nutrient selection for the grow cycle, your watering schedule and overall plant health and yield capacities.

In-ground vs Containers:

When you grow directly in the ground, the plants are provided with more room for root expansion. Your plants will be in one location which can have its downfalls if the weather was to get out of hand. Growing in containers gives you the ability to move your plants if you have to but also gives you more control over the root zone in general. The size of your root determines the size of your fruits. This is an old phrase that has some truth to it but really isn’t set in stone.

growing cannabis outdoors

Soil vs. Soilless Mediums: 

Soil is up of living organisms, organic material, sand, clay or loam. Is rich in nutrients and can be easier for beginners to manage. The occasional supplement of nutrients in the form of a compost tea can go a long way. Many hardcore organic growers have their own special soil mixture that they make over the years. Giving an extra uniqueness to their growing talents and cannabis as a whole. Soilless mediums like coco-coir and perlite normally are inert, it hold no nutrients. Some more experienced growers prefer this. This gives them the freedom to give the plant what it needs when it needs it. Although Soilless mediums can be treated like soil, it is important to know that it has more in common with hydroponics than it does with organics.

  1. What is your water quality like?

Water not only is essential to growing cannabis but the quality of the water will drastically affect your outcomes. Know where the water is coming from. This alone will make you smarter and more effective at growing dank. Think of the following:

Water Source: Is it rainwater, tap water or are you getting it from a dam or river? Your water source often will have its own set of challenges from pH to mineral content (TDS) and toxicity. Cannabis plants will thrive in water that is kept in check. Every phase of your plants’ life produces better at a different pH. Different nutrient uptakes and all those things are important with the pH. So knowing if you have Hard or soft water will help you in making a decision in filtration or aeration of the water prior to you feeding it to the plants. The better your attention to detail the better your cannabis plant will reward you.

growing cannabis outdoors

Watering Schedule: During the season your water demands will change. Will you be able to adjust your watering schedule and amounts? Soil and Soilless mediums have their own set of challenges when subjected to outdoor weather. Be mindful of this and ensure you can stay on top of this.

  1. Your Budget

We can spend zero rands on a grow and still grow dank. We can spend little bits of money or thousands. This is all determined by your budget and needs. Growing can be simple or complex. Your scale and the quality you wish to achieve will affect your pocket. Know that not everything is free.

Initial Setup Costs: Consider the cost of seeds or clones, Growing containers or even building raised beds, nutrients, grow medium and equipment you will need like pH meters, soil moisture meters etc. Everything adds up. And they add up quickly. So budget ahead of time. See what you can afford and use what you can. Here is what I did when I started. I couldn’t afford a pH meter. So I went to my local fish pet store and bought the liquid pH test kit. It will give you an indication of where you are on the pH scale.

growing cannabis outdoors

Backup Funds: Knowing that things will break and eventually need replacing. You should consider building a fund for your grow to help replace things as the grow is ongoing. YOu will find that many other expenses will pop up for things unexpected. Instead of having it surprise you and take from your day-to-day money. Put a little bit aside for this event. It is bound to happen.

  1. Do you have the Time?

Growing really good cannabis is time-consuming. Like anything else. The more you invest into it the more it can reward you. Be realistic regarding this. Do not expect the best out of the plants if you are not present. 

Time Commitment: You need to water the plants. Monitor them for issues and perform basic clean-up on the plant. If you don’t it will just negatively affect your desired outcomes and cause more issues in the growing cycle. How much time do you really have for all this? Maybe growing all those plants is not gonna work… Start small and grow within your means.

You should set up an almost ritualistic schedule around your plants and your lifestyle. If you have to be somewhere by 8 am… Be in the garden by 7… if you get home at 5 pm… start your monitoring at 6 pm… Make a plan but don’t do nothing.

  1. Are you willing to Adapt?

Growing Cannabis Outdoors is rewarding but it can truly challenge you as a person. Are you tenacious and do you think out of the box? Sometimes you are forced to be creative to help your plants. Sometimes you need to be a scientist to get the best out of your cannabis. Are you capable of this? Or even willing to give it a go?


Problem-Solving: Your ability to respond to these challenges will greatly impact the quality of your grow. Whether it’s adjusting to an unexpected cold snap or finding a quick solution to a pest infestation, being adaptable is key.

Learning and Adjusting: Each growing season offers lessons. If something goes wrong, take it as an opportunity to learn and improve your methods for the next season. Your willingness to adapt and evolve will be a major factor in your success.

Growing cannabis outdoors

Starting an outdoor cannabis grow can be an incredibly rewarding experience, but it requires careful planning and consideration of several factors. By taking the time to assess your space, environment, grow medium, water quality, budget, schedule, and adaptability, you’ll set yourself up for a successful growing season. Remember, every grow is a learning experience, so don’t be afraid to make adjustments along the way and learn from your successes and challenges. Happy growing!

Posted on

Permaculture: An Overview

Permaculture an overiew

The philosophy and ethics of permaculture form the bedrock upon which the entire discipline stands. Permaculture, a portmanteau of “permanent agriculture” and “permanent culture,” represents a holistic approach to designing environments that emulate the patterns and relationships found in natural ecosystems. Bill Mollison, one of the pioneers of the permaculture movement, introduces this unique approach with a focus on sustainable living, advocating for a shift from exploitative practices to regenerative ones that enhance the well-being of the Earth and its inhabitants.

Permaculture

At the heart of permaculture lies a set of core ethics that guide every action and decision within the framework. The primary ethics of permaculture are Earth Care, People Care, and Fair Share. Earth Care emphasizes the importance of preserving and restoring natural systems, ensuring the health of the planet for future generations. People Care focuses on the well-being of individuals and communities, promoting practices that support physical, mental, and social health. Fair Share advocates for equitable distribution of resources, encouraging practices that limit consumption and foster sharing and cooperation.

Understanding Natural Systems – Patterns, Cycles, and Feedback

Understanding and harnessing the intricacies of natural systems is pivotal. At the heart of this is the recognition of natural patterns, cycles, and feedback loops, which govern the functioning of ecological systems. Bill Mollison emphasizes the importance of working with, rather than against, these natural phenomena to create sustainable and self-regulating designs.

Natural patterns are the recurring configurations found in nature, such as the spiral shapes of galaxies, the branching of trees and rivers, or the tessellation of honeycombs. These patterns are not only aesthetically pleasing but also functionally efficient. For example, the branching pattern in trees and rivers optimizes the distribution of nutrients and water, while the spiral pattern in shells and hurricanes promotes efficient energy flow. In permaculture design, recognizing and incorporating these patterns can lead to more effective and sustainable systems. For instance, using keyline design for water distribution mimics the natural flow of water across landscapes, ensuring even hydration and reducing erosion.

Cycles are another fundamental aspect of natural systems. These are the recurring processes that sustain life, such as the water cycle, nutrient cycles, and seasonal cycles. Each cycle plays a crucial role in maintaining the balance and health of ecosystems. In permaculture, understanding these cycles allows us to create designs that support and enhance them. For example, integrating water reuse systems and rain gardens into a permaculture design can help sustain the water cycle by capturing and purifying rainwater, thereby reducing the need for external water sources.

Designing Sustainable Systems

Designing sustainable systems is at the heart of permaculture, providing a blueprint for creating environments that are resilient, self-sustaining, and in harmony with natural processes. The methodologies and strategies employed in permaculture design encompass a range of practices aimed at achieving these goals. Central to this endeavor is a deep reliance on observation and thoughtful planning, which ensures that designs are well-adapted to their specific contexts and needs.

Permaculture

The first step in effective permaculture design is thorough observation. This involves spending significant time understanding the unique characteristics of the site – its climate, soil type, topography, water availability, and existing flora and fauna. By observing the natural patterns and cycles present in the environment, designers can identify how to work with these forces rather than against them. This foundational knowledge allows for the creation of systems that function in harmony with the ecosystem. The design process incorporates permaculture principles such as diversity, edge effect, and stacking functions, ensuring that each element within the system serves multiple purposes. For example, a tree might provide shade, food, habitat for animals, and contribute to soil fertility through leaf litter.

The design process incorporates permaculture principles such as diversity, edge effect, and stacking functions, ensuring that each element within the system serves multiple purposes. For example, a tree might provide shade, food, habitat for animals, and contribute to soil fertility through leaf litter.

Water Management

Water management is a critical aspect of permaculture design, serving as the lifeblood of sustainable ecosystems. Effective water management in permaculture involves a combination of techniques for harvesting, conservation, and sustainable usage to ensure that this most valuable resource is used to its utmost efficiency. One of the fundamental techniques for collecting water in permaculture systems is rainwater harvesting. This involves capturing and storing rainwater from surfaces like rooftops or specially designed catchment areas. The use of rain barrels, cisterns, and swales—shallow channels designed to redirect surface runoff—are all common methods.

Sustainable water usage in permaculture is also about reducing waste and recycling water wherever possible. Greywater systems, which recycle water from household uses such as sinks, showers, and washing machines, can be treated and reused for irrigation. This not only reduces the demand on freshwater supplies but also provides a steady source of water for gardens and landscapes.

Soil Health and Management

Soil health and management are paramount in any sustainable agriculture system, and permaculture places a strong emphasis on building a fertile foundation for growing plants. Healthy soil is the bedrock of productive and resilient ecosystems, providing essential nutrients, supporting plant roots, and contributing to water retention and drainage. To achieve and maintain soil health in permaculture, a variety of methods can be employed, each focusing on enhancing the natural functions and fertility of the soil.

Permaculture

One primary method of improving soil fertility is through composting. This process turns waste into valuable humus, rich in nutrients, and beneficial microorganisms that improve soil structure and fertility. Properly managed composting can accelerate the breakdown process, ensuring the material reaches a stable form that can be safely and effectively applied to garden beds, fields, and orchards, thereby boosting the soil’s organic content and nutrient availability.

Integrating Plants and Animals

In permaculture, the integration of plants and animals plays a crucial role in establishing a balanced and productive ecosystem. The symbiotic relationships between flora and fauna are foundational to creating systems where every organism supports and enhances the well-being of others, contributing to a resilient and self-sustaining environment. 

Plants and animals each have unique functions and benefits within a permaculture system. Plants, for instance, are vital for capturing solar energy through photosynthesis, creating biomass, and providing food and habitat for various animal species. They contribute to air quality by absorbing carbon dioxide and releasing oxygen, and their root systems help stabilize soil and prevent erosion. Animals, on the other hand, play essential roles in pest control, pollination, soil fertilization, and seed dispersal. They also contribute organic matter through their waste products, which are valuable nutrients for plants.

Permaculture

Beneficial plant and animal relationships are illustrated through practices such as the use of nitrogen-fixing plants in polycultures. Leguminous plants like clover, peas, and beans have symbiotic relationships with nitrogen-fixing bacteria, which convert atmospheric nitrogen into a form usable by plants. Including these plants in a system can significantly enhance soil fertility without the need for synthetic fertilizers. Planting insectary plants, which attract beneficial insects such as pollinators and predators of pests, provides a natural form of pest control, reducing the reliance on chemical pesticides.

In Conclusion

There is lots more that can be said about permaculture. Ultimately, permaculture is more than just a method of agriculture or land management; it is a philosophy that encompasses a way of life. It calls for a deep connection to the Earth, a commitment to sustainability, and a recognition of the interconnectedness of all living systems. By adhering to its ethics and principles, individuals and communities can contribute to a more sustainable and equitable world, fostering a culture that values cooperation, conservation, and creativity in addressing the challenges of the modern era.

Posted on

Growing From Seed or Clone?

Growing from seed or clone

As the cannabis industry continues to flourish, many enthusiasts and cultivators are diving into the art of growing their own plants. It’s truly remarkable. The amount of new growers every season grows exponentially. 

One of the most crucial decisions they face is whether to grow from seeds or clones. Both methods have their unique advantages and disadvantages, and understanding these can help growers make informed choices. Today, we will delve into the pros and cons of growing cannabis from seeds and clones, providing detailed insights to help you determine the best approach for your cultivation goals. For the sake of it all, when we mention “seeds” or “seed” we refer to regular cannabis seeds. Not feminized seeds, nor autoflowering cannabis seeds. This is a topic for a different day.

Understanding Cannabis Seeds

Genetic Diversity

One of the primary benefits of using seeds is the genetic diversity they offer. Each seed results from pollination between a male and a female plant, creating a unique genetic combination. This diversity allows growers to explore various strains and phenotypes, potentially discovering new and exciting characteristics. Something most experienced growers are looking for. Some growers grow hundreds , thousands of regular plants at a time to find only 1 or 2 very unique cannabis plants. These are the plants that we the consumers are enjoying on the streets. For every strain, Girl Scout Cookies to make it to market, thousands of cannabis plants went through a genetic selection. And this is truly the beauty of regular cannabis seeds.

growing from seed or clone

Stronger Root Systems and Higher Yield

Plants grown from seeds typically develop stronger root systems. This robust root structure supports vigorous growth and can lead to higher yields compared to clones. The extensive root network allows the plant to absorb more nutrients and water, fostering healthier and more productive growth. It is not to say that it will always produce stronger and higher yields. Just bare this in mind.

Pest and Disease Resistance

Seeds generally exhibit greater pest and disease resistance. Since they are not direct clones of another plant, they do not inherit any genetic weaknesses or susceptibilities. This resilience can result in a healthier garden with fewer pest and disease issues. Local cultivators have used cannabis breeding to their utmost benefit. They are purposefully breeding more and more mould-resistant genetics, for local markets. Allowing for more superior terra-flowers to grow

Longer Growing Time

However, growing from seeds involves a longer growing time. Seeds need to germinate, and the seedlings must establish themselves before they start to grow vigorously. This initial phase can take several weeks, extending the overall cultivation period. This generally doesn’t bother the organic grower that grows with the season in a greenhouse or outside. An indoor grower should consider their cultivation time much more, as this will directly implicate in electricity bills for longer light running time. During this grow phase of the plant your lights will run at an average 18 hours on 6 hours off.

growing from seed or clone

Gender Identification

Another challenge with seeds is gender identification. Cannabis plants can be male, female, or hermaphroditic. Male plants must be identified and removed to prevent pollination, which can lead to seedy buds and reduced potency in the female plants. This process requires careful monitoring and early identification of male plants. Spending time to grow from seed just to find a male plant that won’t produce flowers is not ideal either. Hence why there are some transplanting and stages that growers set up for themselves during the vegetative phases of the plant in order to streamline and cut costs on the grows. 

Variable Quality

Not all seeds will grow into healthy plants, leading to variable quality. Some seeds may fail to germinate or produce weak plants, which can be frustrating and costly. It is essential to source high-quality seeds from reputable breeders to minimize these risks. Thankfully our market is becoming more and more sophisticated by the year, and finding a reputable online source has become easier. Some grow stores even sell seeds too.

Exploring Cannabis Clones

Consistent Quality

Clones offer consistent quality because they are genetically identical to the parent plant. This uniformity ensures that the desired traits, such as potency, flavour, and growth characteristics, are preserved in each new plant. For commercial growers, this predictability is invaluable. But more and more home growers are finding that this is much easier for them to manage, saving them time and money. You know what you will get and that is also not a bad thing for cultivators.

Faster Growing Time

Clones can be planted directly into the growing medium and begin developing immediately, leading to a faster growing time. This accelerated growth cycle allows growers to harvest more frequently, increasing overall productivity. When sourcing clones from a grower or entity, they should come ready to plant. A sign of a good nursery is the state of health the plants arrive in. You skip 4-6 weeks out of your cultivation and depending on your method of cultivation some can go straight into the flower phase from a 20cm clone. Cutting down Cultivation to 8 – 10 weeks.

growing from seed or clone

No Gender Identification Needed

With clones, there is no need for gender identification. Since clones are taken from a female plant, all the new plants will also be female. This eliminates the risk of accidental pollination and ensures that all plants produce high-quality, seedless buds. The only risk you might run into is hermaphrodism, as plants that come under high-stress seed themselves, called Selfing. 


Limited Genetic Diversity

However, clones come with their own set of limitations. One significant drawback is the limited genetic diversity. Using clones restricts growers to the genetics of the parent plant, which can be a disadvantage if those genetics are not ideal for certain growing conditions or if they lack desirable traits. Growers should always be mindful of the strains they are selecting and in which environment their clones come from.

Increased Risk of Pests and Diseases

Clones can also carry over pests and diseases from the parent plant. Any genetic weaknesses or susceptibilities present in the parent will be passed on to the clones. This can result in increased vulnerability to infestations and infections, requiring vigilant pest management practices. If the clones come dirty to you and you don’t have any protocol in place, you will infect the entire grow space. So another trick when getting clones from anyone would be to isolate and treat them first for any mould and bacteria before introducing them to the space. Pathogens can latch on during the transportation process, insect vectors and many other things. So just because you getting them from a clean nursery doesn’t mean when they arrive by your doorstep they will be clean.

Making the Right Choice

Choosing between seeds and clones ultimately depends on your specific needs and preferences. Here are some factors to consider when making your decision:

If you value genetic diversity and enjoy experimenting with different strains, growing from seeds might be the better option. Seeds offer the opportunity to discover unique phenotypes and tailor your garden to specific preferences. However, if you prioritize consistent quality and uniformity in your harvests, clones are likely the way to go. The predictable nature of clones ensures reliable results with every crop.

Assess the time and effort you are willing to invest in your cultivation process. Growing from seeds involves a longer initial phase and the need for gender identification, which can be labour-intensive. Clones, on the other hand, streamline the process by eliminating the need for these steps and speeding up the growth cycle.

growing from seed or clone

Conclusion

Both seeds and clones have their distinct advantages and drawbacks. Understanding these can help you make an informed decision that aligns with your cultivation goals. Whether you choose the genetic diversity and higher yield potential of seeds or the consistent quality and faster growth of clones, it is crucial to source your seeds or clones from reputable suppliers. High-quality genetics are the foundation of a successful cannabis garden, ensuring healthy plants and bountiful harvests.

Posted on

What is the Soil Food Web?

What is the Soil food Web?

Soil is more than just dirt; it is a vibrant, living ecosystem teeming with microscopic life. Understanding the soil food web begins with comprehending that soil is composed of a mix of minerals, organic matter, gases, liquids, and countless organisms. These include a multitude of microbes that play pivotal roles in maintaining soil health.

The term “Soil Food Web” was made popular by Dr Elaine Ingham, an American Microbiologist, who some refer to as the mother of regenerative agriculture. Our blog is inspired by her work and by author Jeff Lowenfels, Teaming up with Microbes.

Soil Food Web Image
Soil Food Web Diagram

The concept of the Soil Food Web 

It revolves around the interactions between these microorganisms, plants, and animals within the soil environment. This web includes various bacteria, fungi, protozoa, nematodes, and arthropods, each performing essential functions that facilitate nutrient cycling, organic matter decomposition, and plant health. At the foundation of the soil food web are primary decomposers like bacteria and fungi, which break down organic materials and release nutrients in forms accessible to plants. These primary decomposers are preyed upon by larger microorganisms and soil fauna, creating an intricate network of energy and nutrient flows.

The significance of the soil food web cannot be overstated. 

Healthy soil is the cornerstone of robust plant growth, influencing everything from nutrient uptake to resistance against pests and diseases. It also plays a key role in larger ecological processes, such as carbon sequestration, water retention, and erosion control. A rich and diverse soil microbiome contributes to the physical structure of the soil, enhancing its ability to support plant roots and retain moisture. Conversely, disrupted or degraded soils often lack the microbial diversity necessary to sustain these crucial functions, resulting in poor plant performance and increased environmental vulnerability.

In essence, by recognizing and fostering the various organisms within the soil food web, gardeners, farmers, and land stewards can promote more sustainable and resilient ecosystems. This approach aligns with broader environmental goals, offering a pathway toward more sustainable agricultural practices, improved food security, and enhanced ecosystem services. As we delve deeper into the roles of specific microorganisms like bacteria, archaea, fungi, protists, and nematodes in subsequent sections, the interconnected nature of the soil food web will become ever more apparent, underscoring the need for integrated soil management practices.

The Role of Bacteria and Archaea in Soil Health 

Bacteria and archaea play indispensable roles in the health of soil ecosystems. Despite their microscopic size, these organisms are powerhouses of activity, driving numerous essential processes that underpin plant health and soil fertility. In “Teaming with Microbes,” Jeff Lowenfels delves deeply into the crucial functions these microorganisms perform, their interactions within the soil food web, and the methods gardeners and farmers can employ to enhance their beneficial activities.

Bacteria 

Are among the most prolific and versatile organisms in the soil. They execute a plethora of functions that are vital for nutrient cycling. A significant role of bacteria is the decomposition of organic matter. By breaking down complex organic compounds into simpler molecules, bacteria help recycle essential nutrients such as nitrogen, phosphorus, and sulfur, making them available to plants. This process is particularly important for the formation of humus, a stable component of soil organic matter that improves soil structure, water retention, and nutrient availability.

Another critical function of soil bacteria is nitrogen fixation. Certain bacteria, known as diazotrophs, have the ability to convert atmospheric nitrogen into ammonia, a form of nitrogen that plants can readily absorb and utilize. This symbiotic relationship is most famously illustrated by the Rhizobia bacteria, which form nodules on the roots of leguminous plants. Inside these nodules, the bacteria convert atmospheric nitrogen into forms usable by plants, enhancing plant growth and reducing the need for synthetic nitrogen fertilizers.

Bacteria and Archea in Soil under microscope

Archaea

Though similar to bacteria in many ways, have distinct roles in soil ecosystems. One of their most notable contributions is participation in methanogenesis, the production of methane under anaerobic (oxygen-free) conditions. Methanogenic archaea thrive in water-logged or compacted soils where oxygen is limited. While methane production can contribute to greenhouse gas emissions, in a balanced ecosystem, these archaea play a role in carbon cycling, breaking down organic materials that bacteria and fungi cannot decompose under aerobic conditions.

Both bacteria and archaea contribute significantly to the suppression of soil-borne pathogens. By outcompeting harmful microbes for resources and space or by producing antimicrobial compounds, these beneficial microorganisms help maintain a healthy soil microbiome and reduce the incidence of plant diseases.

Promoting beneficial bacterial and archaeal activity

Incorporating organic matter, such as compost or well-rotted manure, into the soil provides a food source for these microorganisms, encouraging their growth and activity. Minimizing soil disturbance through reduced tillage practices helps maintain the complex soil structures that support microbial habitats. Additionally, avoiding the overuse of chemical fertilizers and pesticides is crucial, as these can disrupt microbial communities and diminish their beneficial effects.

They are fundamental to the health and productivity of soil ecosystems. Their roles in nutrient cycling, nitrogen fixation, pathogen suppression, and organic matter decomposition are irreplaceable. By understanding these functions and employing methods to foster a thriving microbial community, gardeners and farmers can enhance soil health, promote sustainable plant growth, and contribute to the overall resilience of agricultural ecosystems.

The Critical Functions of Fungi in the Soil Ecosystem

Fungi play a vital role in the soil ecosystem and exhibit fascinating functions that are crucial for plant health and overall soil structure. Two main types of fungi dominate the soil environment: mycorrhizal fungi and saprophytic fungi. Understanding the distinct roles of these fungi can shed light on their unparalleled importance in soil ecosystems.

Mycorrhizal fungi 

They establish a symbiotic relationship with plant roots, forming intricate networks called mycorrhizae. These networks significantly enhance a plant’s ability to absorb nutrients and water. Mycorrhizal fungi extend far beyond the root zone, accessing nutrients that roots alone cannot reach. They are particularly effective at solubilizing phosphorus, a vital nutrient often locked in soil particles, and transporting it back to the host plant. This symbiotic exchange not only aids plant growth but also enhances the plant’s resistance to stress and pathogens.

Saprophytic fungi

These, are decomposers. They break down dead organic matter into simpler compounds, such as leaf litter, wood, and other organic debris. This decomposition process is essential for nutrient cycling, as it releases critical nutrients back into the soil, making them available for uptake by plants. Saprophytic fungi are pivotal in maintaining the humus layer of the soil, which is crucial for retaining moisture and fostering a hospitable environment for other microorganisms.

Fungi
Mycelium in Soil

Fungi contribute significantly to the physical structure of the soil as well. The mycelium—extensive networks of fungal filaments—binds soil particles together, enhancing soil aggregation. This leads to improved soil structure, with better aeration and water retention. Fungal networks create macro-pores in the soil, which facilitate the movement of air, water, and roots through the soil profile. These structures are essential for creating a resilient and thriving soil environment.

Encouraging beneficial fungal growth

This can be achieved through several best practices. First, minimizing soil disturbance is crucial. Tilling and other disruptive practices can break up fungal networks and deplete their populations. Instead, adopting no-till or reduced-till farming practices can preserve these beneficial fungi. Incorporating organic matter into the soil is another effective way to promote fungal growth. Organic matter serves as both food and habitat for fungi. Composting, mulching, and cover cropping introduce ample organic material into the soil, supporting a thriving fungal community. It’s also important to maintain soil pH within the optimal range for fungal activity, typically between 5.5 and 7.5. This can be achieved through thoughtful soil amendments and regular soil testing.

Protists and Nematodes – The Lesser-Known Soil Dwellers 

Protists and nematodes may not be as well-known as bacteria and fungi, but they play crucial roles in the health and functionality of the soil ecosystem. These microscopic and often overlooked organisms are vital components of the Soil Food Web, contributing significantly to nutrient cycling, plant health, and soil quality.

Protists 

Encompass a diverse group of single-celled organisms, including amoebas, ciliates, and flagellates. These microorganisms thrive in the thin films of water that coat soil particles, making them active participants in the soil food web. Protists primarily feed on bacteria, helping to control bacterial populations and prevent any single species from dominating and destabilizing the soil ecosystem. Through predation, protists recycle nutrients, making them available to plants and other soil organisms. By digesting bacteria and releasing nitrogen in the form of ammonium, protists play a crucial role in the nitrogen cycle, enhancing plant growth and soil fertility.

Nematodes, or roundworms

Are another important group of soil dwellers. These tiny, worm-like creatures live in the water films surrounding soil particles and have a range of dietary preferences. Some nematodes are bacterial feeders, while others prefer fungi, protozoa, or even plant roots. Predatory nematodes feed on other nematodes and small soil organisms. In agricultural soils, the presence of beneficial nematode species can suppress soil-borne diseases and pests by preying on harmful nematodes and insects. Their activities help regulate the populations of other soil organisms, contributing to a balanced and resilient soil ecosystem.

Interactions between protists, nematodes, and other soil microorganisms are complex and dynamic. Protists, by feeding on bacteria, indirectly affect nematode populations that feed on bacteria and fungi. Similarly, predatory nematodes can influence the abundance and activity of other soil organisms. These interactions drive the nutrient cycles and energy flows that sustain healthy soil systems. For instance, nematodes and protists release nutrients locked in organic matter through their digestive processes, making these nutrients available for plant uptake.

Nematode
Nematode under Microscope.

The impact of protists and nematodes 

Through their feeding activities, these organisms enhance nutrient availability, improve soil structure, and suppress pathogens. Nematodes that feed on plant roots can be harmful in excessive numbers, causing root damage and decreasing plant vitality. However, their presence in moderate numbers can stimulate root growth and nutrient absorption by creating microchannels in the soil, which improve aeration and water infiltration. Furthermore, some nematodes release plant growth-promoting substances, further supporting plant health.

Building and Maintaining a Healthy Soil Microbiome

Creating and sustaining a vibrant soil microbiome begins with a comprehensive understanding of your soil’s current health. To start, a soil health assessment is crucial. This assessment typically includes testing for pH levels, nutrient composition, and the presence of organic matter. It’s advantageous to include a biological assay that identifies key microbial populations within your soil. 

Once the health of your soil has been established, the next step is to improve and maintain it through the addition of compost and organic matter. Compost acts as a powerhouse for enriching the soil microbiome. High-quality compost is not just decomposed organic matter; it is a bustling community of microbes that include bacteria, fungi, protozoa, and even nematodes. These organisms play pivotal roles in breaking down complex organic materials into forms that plants can absorb. The addition of compost not only introduces beneficial microbes but also enhances the soil’s physical structure, promoting better aeration and water retention.

Learnt anything? Comment your thoughts below

Posted on

5 Common Pests & Diseases

5 common pests & diseases

Healthy and robust plants are less attractive to pests and diseases, however weak and malnourished plants are attacked more easily. At the same time, healthy plants are better equipped to deal with the attack, while the weak will be less able to cope. Early detection of the problem is a major factor in its eradication.

In outdoor cultivation, we can count on the help of certain plants. For deterrence of cannabis pests, companion plants such as Nasturtium, Chinese Carnation, basil, wormwood and sage can be planted to form a micro-balanced and self-regulating ecosystem. Generally, flowers and herbs help ward off pests and attract beneficial insects to our garden.

Let’s look at some more methods for the treatment of the 5 most common pests in the South African climate. We always aim for ecological solutions, as cannabis is a product intended for human consumption.

Pests and Disease

Spider mites

Spider mites are tiny arachnids, often less than 1 millimetre in size, that infest various plants. These pests are known for their ability to reproduce rapidly, leading to severe infestations if not managed promptly. Spider mites feed on plant sap by piercing plant cells with their mouthparts, causing damage that appears as tiny yellow or white spots on leaves. Over time, this feeding can lead to leaf discolouration, wilting, and even plant death. Spider mites thrive in hot, dry conditions and are commonly found on the undersides of leaves, where they spin fine webs as they feed and reproduce.

What to do:

A simple homemade remedy to control spider mites involves using a mixture of water and mild liquid soap. Combine two tablespoons of liquid dish soap with one quart of water in a spray bottle. I add a teaspoon of cayenne pepper too. Shake the mixture well and spray it directly onto the affected plants, ensuring to cover the undersides of the leaves where spider mites are likely hiding. The soap solution works by suffocating the mites and disrupting their cell membranes. The pepper will act as a deterrent, helping get rid of the mites. For best results, apply the solution in the early morning or late evening to avoid harming beneficial insects and to minimize the risk of leaf burn from sunlight. Reapply every few days until the infestation is under control.

We have the options here of help from certain organic products and predatory insects:

The most effective red spider mite predators are Phytoseiulus persimilis, and Amblyseius californicus which can be bought online. Always follow the retailer’s directions closely. We must remember that if we use live predators we should, under no circumstances use pesticides too, even organic ones. Notably, temperatures above 26 degrees and low relative humidity favour their proliferation.

Well-known organic remedies include wettable sulfur, potassium soap, pyrethrins, neem, or natural products that have extracts of cinnamon, camomile or wormwood.

pests and diseases

White fly

Whiteflies are small, winged insects that belong to the family Aleyrodidae. They are typically found on the undersides of leaves and are known for their white, powdery wings. Whiteflies feed on plant sap, extracting nutrients and weakening the plant. This feeding process can lead to yellowing of leaves, stunted growth, and a general decline in plant health.

Additionally, whiteflies excrete a sticky substance called honeydew, which can attract sooty mould, further harming the plant and reducing its ability to photosynthesize effectively.

What to do:

Both for early detection and for eradication, chromatic traps (sometimes also called ‘cues’) are a good call. These insects are attracted to the color yellow, and become stuck in the traps.

Good organic remedies include neem, pyrethrum and other medicinal plants (such as Nasturtium, Marigold, Onions and Garlic) are also effective.

A homemade remedy to control whiteflies involves using a mixture of water, liquid dish soap, and neem oil. In a spray bottle, combine one quart of water with one tablespoon of liquid dish soap and one teaspoon of neem oil. Shake the mixture well and spray it onto the affected plants, focusing on the undersides of the leaves where whiteflies congregate. The soap helps to suffocate the insects, while neem oil acts as a natural insect repellent and disrupts the life cycle of the whiteflies. Apply this solution in the early morning or late evening to avoid harming beneficial insects and to prevent leaf burn. Reapply every few days until the whitefly population is under control.

As the most effective remedy we have some natural predators – in this case, the very effective Encarsia Formosa wasps, Macrolophus (also good for spider mites) or Amblyseius swirskii, which stands out amongst others for its effectiveness and resistance to high temperatures.

Pests & Diseases

Caterpillars

Caterpillars are the larval stage of butterflies and moths, belonging to the order Lepidoptera. These larvae are typically elongated, soft-bodied, and segmented, with varying colours and patterns depending on the species. Caterpillars are voracious feeders, primarily consuming leaves and other plant parts, which can lead to significant damage in gardens and agricultural crops. As they feed, they create holes and ragged edges on leaves, weakening the plants and affecting their growth and productivity. Some caterpillar species can also burrow into fruits and stems, causing further harm to the plants. Caterpillars cause great damage outdoors and in the greenhouse or polytunnel. They are difficult to combat and can leave growers defeated.

What to do:

Spotting them early and taking preventative action would be the ideal way of going about them. Once they get going, you can lose crop overnight without seeing any damage… Until it is too late and buds are falling off from the plants. 

A homemade remedy to control caterpillars without using bacteria involves a mixture of water and chili pepper. To make this solution, blend two fresh chili peppers with one quart of water until smooth. Strain the mixture through a cheesecloth or fine mesh to remove any solid particles, then pour the liquid into a spray bottle. Add a few drops of liquid dish soap to help the solution adhere to the leaves.

Spray the chilli pepper solution onto the affected plants, focusing on areas where caterpillars are present. The capsaicin in the chilli peppers acts as a natural deterrent, making the leaves unpalatable to caterpillars. Be sure to apply the spray in the early morning or late evening to avoid harming beneficial insects and to prevent leaf burn from sunlight. Reapply every few days or after rainfall until the caterpillar population is under control.

Another way is pheromone trapping. Pheromones are chemicals produced by females to attract males. They consist of a trap for adult butterflies and moths; males are attracted to pheromone tablets and poisoned, thus disrupting the reproductive cycle and preventing Caterpillar proliferation.If you are growing in a greenhouse, it is worth using fabrics or nets.

Another weapon is Bacillus thuringiensis, a bacterium that attacks the digestive system of caterpillars causing them to die of starvation. However, we recommend a selective use of them because many applications may have residual effects on our buds. Steinernema carpocapsae is another predator, a microscopic roundworm that lives in the soil, and is an entomopathogenic nematode.

Pests & Diseases

Powdery mildew

Powdery mildew is a common fungal disease that affects a wide variety of plants, characterized by white or greyish powdery spots that form on the leaves, stems, and sometimes flowers and fruits. This disease thrives in warm, dry climates and can spread rapidly, covering entire plant surfaces if not controlled. The powdery coating can block sunlight, reducing photosynthesis and weakening the plant. Infected leaves may become distorted, turn yellow, and eventually drop off, leading to reduced plant vigour and yield.

What to do:

Fungi are very, very difficult to combat, once they appear, both outdoors and indoors. It is possible to take preventive measures such as proper ventilation and humidity control, and good spacing between plants. As for treatments we have with sulfur, horsetail, nettle extracts, cinnamon, and Propolix. There are also specific microorganism extracts which inhibit the growth of the fungus.

A simple homemade remedy to control powdery mildew involves using a mixture of baking soda and water. Combine one tablespoon of baking soda with one quart of water in a spray bottle. To enhance the effectiveness, add half a teaspoon of liquid dish soap, which helps the solution stick to the leaves. Shake the mixture well and spray it onto the affected plants, thoroughly covering all surfaces, including the undersides of leaves. The baking soda alters the pH level on the leaf surface, creating an environment that is inhospitable to the powdery mildew fungus. For best results, apply the solution in the early morning or late evening and reapply once a week or after rain until the powdery mildew is under control.

Botrytis

Botrytis, commonly known as grey mould, is a fungal disease that affects a wide range of plants, especially in cool, damp conditions. It is caused by the fungus Botrytis cinerea, which produces greyish-brown, fuzzy spores on the surfaces of infected plant tissues. This disease can affect leaves, stems, flowers, and fruits, leading to soft, rotting areas that may be covered with the characteristic grey mould. Botrytis can spread rapidly, particularly in humid environments, causing extensive damage to crops and ornamental plants by promoting decay and inhibiting growth. 

Also very difficult to combat and prevent. Spores of all fungi, float in the air and spread very quickly. Botrytis is perhaps the most difficult fungus to fight.

What to do:

Trichoderma harzianum is a natural fungicide which colonizes the root, can act as a protective barrier act minimizing the spread of pathogenic fungus. Other options include Bacillus subtilis or Bacillus velezensis, bacterias that slow the spread of Botrytis. Wormwood extract and thyme are also useful for preventing this.

Once Botrytis is detected, manually or with scissors, remove the infected buds, place them quickly into a bag and throw them away. Remove the entire plant if it is too affected in order to minimize its spread.

We see that insects in general are a little less difficult to combat, because their life cycle, although very fast, is much slower than that of fungi. However, the best way to prevent significant loss is to closely observe your plants, as early detection is always the best control tool. If you take care of your plants they will take care of you.

Posted on

What is Compost Tea?

Compost tea Feature image

Compost tea is a natural gem in the realm of organic gardening. This simple, yet potent brew, made by steeping quality compost in water, unlocks a trove of beneficial nutrients and microorganisms. It’s more than just a fertilizer; it’s a life-enhancing elixir for plants, enriching soil health and bolstering plant resilience in an eco-friendly way. 

This liquid gold will give your garden life and make you much better at organic growing. Revitalising your plants’ overall health.

What is Compost Tea?

Compost tea is a liquid extract derived from compost and is packed with beneficial microorganisms and nutrients essential for garden vitality. It is a unique and organic solution that has become a favourite among gardeners for its ability to enhance soil and plant health naturally.

The Brewing Process:

Brewing compost tea involves steeping compost in water, which is akin to making a giant tea bag filled with compost. During this process, the water becomes enriched with soluble nutrients and beneficial microorganisms such as bacteria, fungi, protozoa, and nematodes.

The key to successful compost tea lies in maintaining a well-aerated environment during the brewing process, which encourages the growth and multiplication of these beneficial organisms.

Aerated Compost Tea (ACT): 

Contains all the species of organisms that were in the compost. Thus the compost has to be “tea-quality”. Those organisms selected by the temperature, foods present, nutrient composition, and oxygen content in the tea brew grow during the brewing process. When oxygen drops below a certain level, nutrients can be lost and disease-causing organisms may grow. Oxygen content is critical, but so is the diversity of aerobic organisms. The competitive set of organisms must be present to prevent pathogen growth. The amount of food added must be limited to enough to attain maximum growth of desired organisms but not so much that oxygen concentration drops below the aerobic level. Balance is critical – maximize growth, but maintain aerobic conditions. Machine cleanliness is important too. Anaerobic biofilms growing in the machine can result in poor-quality tea. Documenting that a consistent, plant-beneficial product is always made is paramount.

Non-Aerated Compost Tea (NCT): 


Requires that low oxygen levels are reached, and this needs to be documented in order to make the claim that this kind of product was made. Certain organisms make specific toxins which combat disease- and pest-organisms. These toxins, like antibiotics, are only made in certain conditions. Machine, recipe, oxygen management and compost used must be documented and understood. The biology in an anaerobic tea is limited to basically anaerobic bacteria and yeasts. Since the set of organisms is so significantly altered from what occurs in aerobic compost, anaerobically brewed teas should not be called compost tea, but designated specifically as anaerobic tea.

Compost tea

Enhanced Plant Nutrition and Growth:

Compost tea is a direct source of essential nutrients like nitrogen, phosphorus, potassium, and trace elements, which are readily available for plant uptake. This immediate nutrient supply can lead to more robust and vigorous plant growth. The microorganisms in compost tea play a crucial role in breaking down organic matter in the soil, thereby improving nutrient cycling and making existing soil nutrients more available to plants.

Disease and Pest Resistance:

Bacteria occupy most of the leaf or root surface and thus are most effective at consuming the food resources that the disease-causing organisms would otherwise consume. Bacteria occupy most of the infection sites, which would otherwise be occupied by the disease-causing organisms. In soil, bacteria have additional functions beyond consuming foods and occupying infection sites, they also retain nutrients (N, P, S, Ca, Fe, etc) in their biomass. Your Compost Tea needs a healthy balance of bacteria, fungi and micro-organisms.

Overall Benefits

  1. Pathogens cannot infect the plant tissues because the specific infection sites on the plant surface is already occupied by beneficial organisms;
  2. Disease-causing organisms have no food and cannot grow because the exudates produced by the plant are used by the beneficial species present on the plant tissues before the disease-causing organisms arrive;
  3. Spaces on the surfaces of plant are physically occupied by beneficial organisms. The pests and pathogens cannot reach the plant surface, and Disease cannot occur; 
  4. Plants take up nutrients in the tea needed to allow them to resist infection more rapidly because the beneficial biology influences leaf surface gas concentrations, causing stomates to open sooner and for a longer time;
  5. Food resources in the tea allow beneficial microorganisms to grow, protecting plant surfaces; 
  6. Nutrients are retained on the leaf surface and become available to the plant with time, improving plant nutrition and health;
  7. soil structure is improved and more oxygen reaches the root system,preventing toxins from being produced in the soil, increasing plant health;

DIY and Cost-Effective: 

Making your own compost tea is a cost-effective solution compared to buying commercial fertilizers and plant treatments. It can be made at home using simple ingredients and equipment.

Ingredients for the Perfect Compost Tea Recipe

Creating the perfect compost tea is akin to crafting a gourmet meal for your garden. Each ingredient plays a vital role in the final product’s quality and effectiveness. 

Here’s a closer look at what you’ll need and why each ingredient is important.

  1. Organic Compost: The Foundation

Quality Matters. The compost is the heart of your tea. It should be well-aged, rich in organic matter, and free from any harmful pathogens or chemicals.  Homemade compost is ideal, but store-bought organic compost works well too. Worm castings, Bat guano also can make a base for Compost tea. Compost made from a diverse range of organic materials (like leaves/woodchips, kitchen bokashi, and grass clippings) will lead to a more nutrient-rich and microbiologically diverse tea.

  1. Water: The Medium

Non-chlorinated is key. Chlorine in tap water can kill the beneficial microorganisms in compost. 

Use rainwater, or pond water(might not be best), or let tap water sit out for 24 hours to allow the chlorine to evaporate. An old trick would be to stick your arm in the water for a while. Your skin will absorb the chlorine and clean the water too. Might cut down the waiting time… but this is a 2 cents type of deal here.  Room temperature water is ideal as extreme hot or cold can shock the microorganisms.

  1. Air Pump: Oxygen Supplier

Aeration for Microbial Growth. Oxygen is crucial for fostering aerobic microorganisms. 

An air pump ensures the tea remains well-oxygenated, preventing the growth of harmful anaerobic bacteria. One can be bought either online or at your local fish shop or nursery. Some of these online stores are my go-to:

Marijuana SA

Hydroponic.co.za

Cleanliness is Crucial: 

Ensure the container is clean to prevent any contamination of the tea.

4. Fuel/Food

Molasses is the preferred sugar of choice. This will help stimulate the growth of bacteria and microorganisms in your compost tea. Ensure that you do not overdo your fuel source as this in large can also slow or cap off the growth.

Step-by-Step Guide: Making Your Own Compost Tea

Creating compost tea is a straightforward process, but attention to detail can make a significant difference in the quality of the final product. 

Step 1: Gather Your Materials

Prepare Your Ingredients: Assemble your organic compost, non-chlorinated water, air pump, and brewing container. Find a cheese cloth-type bag to put all your material in. Placethis in your brewing container.

The amounts you will make will be dependent on your needs. I have always eyeballed my ingredients in honesty.

Cleaning: Ensure all equipment is clean to prevent contamination.

Step 2: Add Water

Add non-chlorinated water to the bucket, leaving some space at the top to prevent spillage during aeration.

Step 3: Aerate the Mixture

Set Up the Air Pump: 

Attach air stones or diffusers to the air pump and place them at the bottom of the bucket. Keep the air pump running continuously to supply oxygen. This step is crucial for encouraging the growth of beneficial aerobic microbes.

Step 4: Brewing Time

Allow the mixture to brew for 24-48 hours. The exact time can depend on the ambient temperature and the desired microbial activity. Check the brew occasionally to ensure that the aeration is consistent and the temperature is stable.

Step 5: Strain and Use

Once brewing is complete, strain the liquid to remove solid particles. Use a cheesecloth, fine mesh, or a paint strainer bag. It is not crucial to strain the compost tea if you plan on using it as a soil drench.

Application: 

Apply the tea as soon as possible after brewing for maximum effectiveness. Dilute with water if it appears too concentrated.

Step 6: Clean Up

Clean all equipment thoroughly after use to prevent any buildup of residual compost or mould. This step is so important and often overlooked. If you avoid this you will find that bacteria will build up on your air hoses and stones and that you can get sludge. This will increase your chances of an anaerobic reaction occurring as well as the batch being contaminated and smelling off.

Compost Tea

|

Application Methods:

Foliar Spray: 

  • Applying compost tea as a foliar spray is a great way to provide nutrients directly to the leaves and can help with disease prevention. 
  • Ensure the spray is fine and covers the leaves evenly.

Soil Drench: 

  • Pouring compost tea around the roots or base of the plant helps improve soil quality and root health. 
  • This method is beneficial for providing nutrients directly to the root zone.

Precautions and Best Practices

  • Ensure the spraying equipment is clean to prevent the spread of any disease.
  • Be cautious when applying to young seedlings or very delicate plants. It’s always better to start with a more diluted solution.
  • Observe how your plants react to the compost tea and adjust your application method and frequency accordingly.

Tips for Success:

  • Brew at a temperature between 12°C and 24°C for optimal microbial activity.
  • Brewing beyond 48 hours can lead to the development of harmful anaerobic bacteria.
  • If unsure of the concentration, it’s safer to dilute the tea more rather than less. A general guideline is a 1:10 ratio of tea to water.

Using Compost Tea

A general guideline is a 1:10 ratio of tea to water, but this can vary based on the strength of your brew and the sensitivity of your plants.

Application Methods:

Foliar Spray: 

  • Applying compost tea as a foliar spray is a great way to provide nutrients directly to the leaves and can help with disease prevention. 
  • Ensure the spray is fine and covers the leaves evenly.

Soil Drench: 

  • Pouring compost tea around the roots or base of the plant helps improve soil quality and root health. 
  • This method is beneficial for providing nutrients directly to the root zone.

Precautions and Best Practices

  • Ensure the spraying equipment is clean to prevent the spread of any disease.
  • Be cautious when applying to young seedlings or very delicate plants. It’s always better to start with a more diluted solution.
  • Observe how your plants react to the compost tea and adjust your application method and frequency accordingly.
Compost Tea
Posted on

Lactic Acid Bacteria: An Organic Growers Powertool

Lactic Acid Bacteria Feature image

Lactic acid bacteria (LAB) are ubiquitous microorganisms that can be beneficial in crop and livestock production. With their long history of use in food preservation by many world cultures, LABs are generally recognized as safe for human consumption. 

Over the years, making Lactic acid bacteria has become a staple add-on for many growers. These microorganisms prolong storage, preserve nutritional value, and enhance flavours of otherwise perishable foods by producing lactic acid as a fermentation metabolite. LABs are easy to collect and economical to culture, store, and use. Let’s have a look at what it is and how you can make your own.

What Are Lactic Acid Bacteria?

“Lactic acid bacteria” (LAB) refers to a large group of bacteria, rather than a single species or strain, that produce lactic acid as a by-product of digesting their food source (usually carbohydrates). The lactic acid accumulates to ferment or “pickle” the food, and LAB are capable of surviving in acidic (low-pH) environments. LABs are widespread in nature and are beneficial probiotics in our digestive systems. They are among the most important groups of microorganisms used in food fermentation, contributing to the taste and texture of fermented products and inhibiting food spoilage caused by other microorganisms. LAB is responsible for the production of yoghurt, cheese, cultured butter, sour cream, sausage, kimchee, olives, and sauerkraut.

Lactic Acid Bacteria
Microscopic image of Lactobacillus paracasei, a source of bacteriocins. Image © 2018 Dr. Horst Neve, Max Rubner-Institut, reused under CC BY-SA 3.0 DE.

How Are LAB Cultured?

When washing rice with clean water in preparation for cooking, colonies of lactic acid bacteria can be collected in the rinse water. Microorganisms other than LAB are also present, but allowing the rice rinse water to sit for 3 to 5 days will cause LAB to become the predominant species. Since the rinse water is low in nutrients, milk is then added as a food source for the LAB. Fresh cow’s or goat’s milk, which is high in lactose (milk sugar), is an ideal food source for LAB proliferation, or culture. The best kind would be unpasteurized. This type of milk will contain fewer antibiotics.

After an additional 3 to 5 days, the LAB culture separates into solid and liquid fractions (similar to curds and whey). The liquid fraction is the LAB culture, which can be used immediately, stored under refrigeration, or kept in a cool, dark place with the addition of brown sugar. This edible culture is used in Natural Farming for both plant and livestock production. The solid fraction is edible as a soft cheese and can also be fed to livestock or composted.

LAB Culture Instructions

1. Wash rice grains and collect the first two rinses of cloudy water.

2. Fill a clean glass jar about 2 /3 full with rice rinse water. Label the jar with the date and contents.

3. Cover the mouth of the jar with breathable cloth (such as muslin) or paper (not plastic) and secure with rubber bands or ties to keep out pests. Store at room temperature away from direct light. Be careful not to shake or move the jar while it ferments.

4. After 3 to 5 days, LAB will multiply and give off a slightly sour odour. There will be a mat of semi-solid material floating on the top of the cloudy liquid in the jar. Collect only the cloudy liquid (fermented rinse water) by pouring off and discarding the mat layer.

5. Depending on the size of your glass jar, measure one part of fermented rinse water and add 10 parts of milk to fill your jar 2 /3 full.

6. As in step 3, cover the mouth of the jar with cloth or paper and secure with rubber bands or ties to keep out pests. Store at room temperature away from direct light. Be careful not to shake or move the jar while it ferments.

7. After 3 to 5 days, the contents of the jar will separate into a floating solid fraction and a yellow liquid fraction. It may take longer in cooler climates. The yellow liquid is the LAB culture, which must be kept alive.

8. Pour off the liquid fraction, being careful not to mix any solids back into the LAB culture. Store LAB culture in a loosely capped plastic or glass bottle labelled with the date and contents.

9. Any LAB culture not used within a week should be refrigerated, or if it must be kept at room temperature, add an equal amount (by weight) of brown sugar. In either case, keep the bottle loosely capped to release gases formed by fermentation, or the container may burst.

10. LAB culture may be kept refrigerated for 6 months. Continue to keep the bottle loosely capped to release gases.

11. LAB culture should have a sweet odour; if the odour becomes unpleasant (rotten) after it has been stored, discard it and make a new batch.

How Is LAB Culture Used for Plant Production?

LAB culture is diluted at a 1:1,000 ratio with water, mixed with a plant nutrient solution such as fermented plant juice (FPJ), and applied as a foliar spray to leaf surfaces of leaf or fruit crops.
Note: Over-application of LAB culture to fruit crops may result in the loss of sweetness (lowered brix) of fruits. Apply sparingly in the latter stages of the fruiting season. LAB culture can also be used in conjunction with other nutrient solutions to treat seeds before planting.

This improves seed germination, inoculates the seed with beneficial microbes, and deters fungal problems, such as “damping off”. LAB is used with IMO (indigenous microorganisms) in Natural Farming in making composts or compost teas for soil preparation before planting. Application of LAB culture can accelerate the decomposition of organic amendments in soils and enhance the release of plant nutrients for absorption.

It is also a great supplement for strengthening cellular walls and has been proven to increase terpene production in cannabis. Helps prevent powdery mildew and provides overall vitality to your plants.

How Is LAB Culture Used in Livestock Production?

LAB culture can transform a malodorous, anaerobic livestock pen, for example, into an odourless system when used in conjunction with an IMO-inoculated deep litter system. LAB culture can also be given to most livestock species to consume through their feed and/or water as a probiotic to help foster healthy gut flora, enhance their immune systems, and aid in digestion.

In Conclusion

Making LAB is simple and with time, your technique of making a strong Lactic Acid Bacteria that is highly effective will increase. I have found that I make a new batch every time I need to use LAB instead of storing my previous LAB. We eat rice often and so it is not difficult to make it. Rice water we have lots of. Give it a go and let us know what you think.